At Phage Australia, we’re scaling up a phage therapy system. Why? Harnessing phages as therapeutics has been attempted by several biotech companies for a few decades, but it’s still not on the market. I’m sure that’ll eventually happen, but even when it does, it’ll only serve a portion of patients.
Because of this, I believe personalized, rescue phage therapy will be done as a service by academic/medical centre collaborations for years to come.
Phage Australia is one example of this, and we’ve spent the last year and a half getting a ‘minimum viable pipeline’ for personalized phage therapy up and running. We now treat about 1 patient a month.
But running a phage therapy service is hard. Especially when done by teams who aren’t used to anything like this. To help other phage therapy centres out there (and maybe even other bio-based services getting off the ground), I want to share what we’re doing here, to help illustrate how we make it work.
In part II of this post, I’ll get into what sorts of tradeoffs we’re making to keep patients safe while still producing phages on time.
An overview of our process, now that we’ve landed on one
In past posts I’ve talked about setting up a new phage-making and phage QC process, and I’ve gone into some of our specific methods, like AKTA Flux-based phage purification, octanol to remove endotoxin, and qPCR for therapeutic monitoring. But I’ve never laid out an overview of our end-to-end process (in part because we hadn’t landed on one — but now we reasonably have).
In this 2-part post, I want to give an overview of the process we’ve landed on; what happens when a patient comes in, what we do in the lab, the overarching steps we go through (from biobanking, to diagnostics, to production, to formulation, to QC, to monitoring), how we divide up the work, how we hand work from one person to the next (from clinicians to lab workers to bioinformaticians to drug committees to clinicians to lab workers to the data team), and most importantly, how we manage expectations from the clinic (at least one patient treated per month) while maintaining safety standards. I’ll highlight some of the pitfalls we’ve hit along the way, the reasons for some of the decisions, and areas we’re looking at for improvement.
I hope it serves as an example others can take ideas from if they’re building a phage therapy center, or any service that relies on biological manufacturing and/or multidisciplinary teams that span the lab and the clinic. Lastly, I’ll leave you with some actionable insights you can take forth and hopefully adapt to your own scenarios.
What happens when a patient comes in…
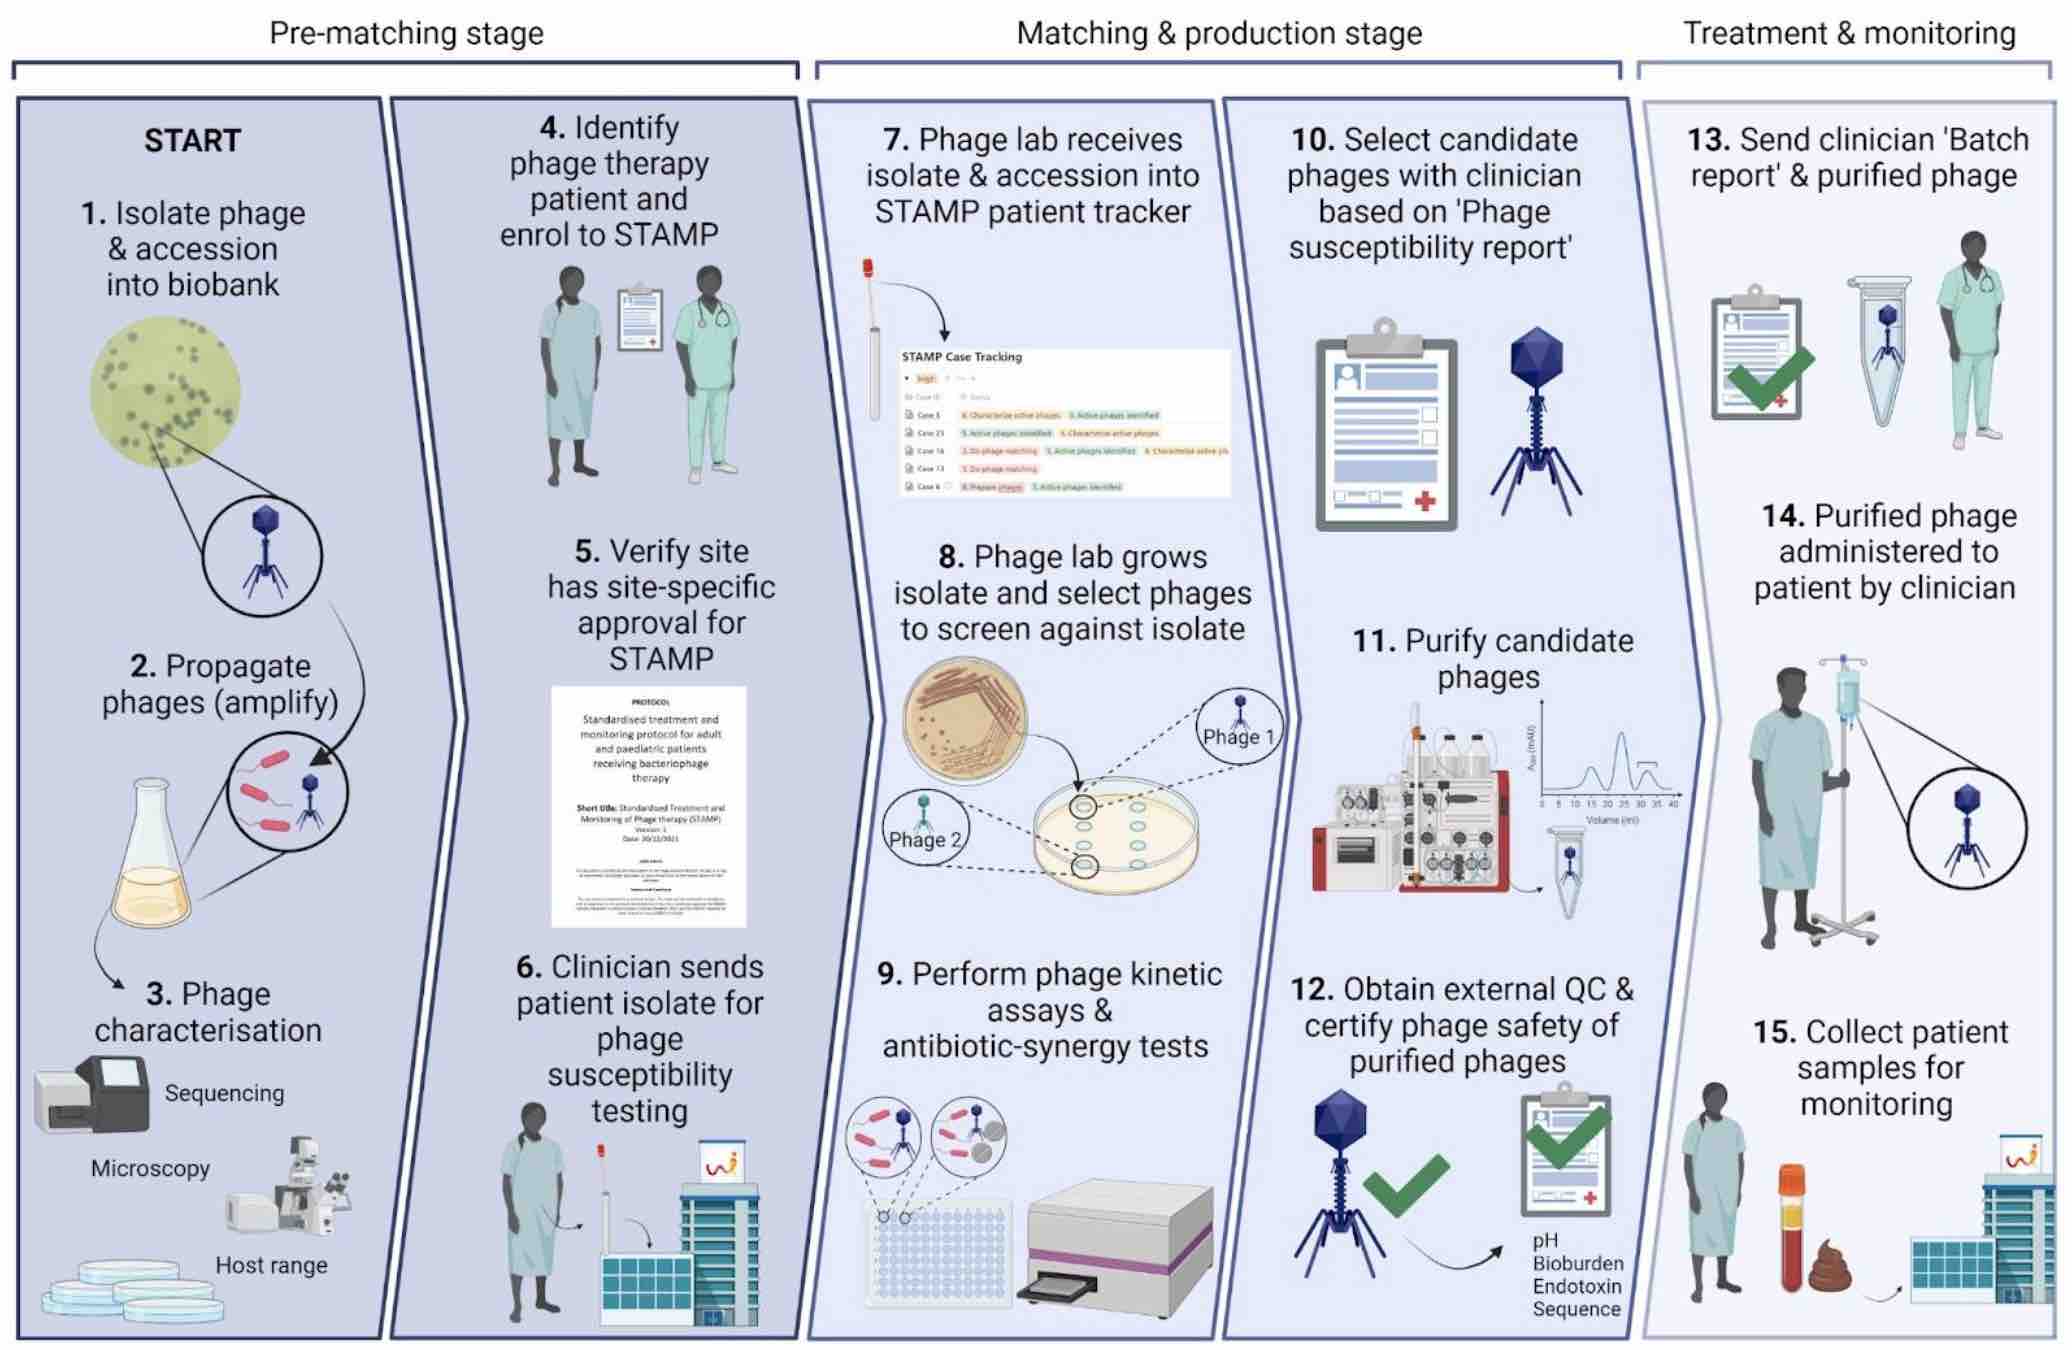
Figure 1: If our clinical team deems a patient is eligible for phage therapy, we get their bacterial isolates and see if we can find phages for them. If we find some that work, we make and purify phages, and check them for safety. We aliquot them into labeled, dose-ready vials. We prepare safety documents for each batch, along with a sample collection package for each patient. We give phages + documents + sample collection package to the clinical team. Lastly, we get blood samples back from the clinical team, and track phages and bacteria over time throughout therapy. Image by Stephanie Lynch.
Overarching steps to our process
Here’s a breakdown of the main steps we take for each patient.
Clinical decision
A patient is sick with an infection and their doctors have decided phages could help. They refer their patient to our clinical team (led by Jon Iredell and Ameneh Khatami), who decide whether they’re a candidate for our STAMP phage therapy trial. They determine things like: is that strain likely to be causing their disease? Has everything else been tried? If they cure that strain, is it likely to help? If all the answers are yes, they get told to send the patient’s strains to our lab.
Diagnostics
We get a phone call when the patient strains are ready to pick up, and we walk over to the hospital lab next door and pick up a few petri dishes marked ‘PHAGE’.
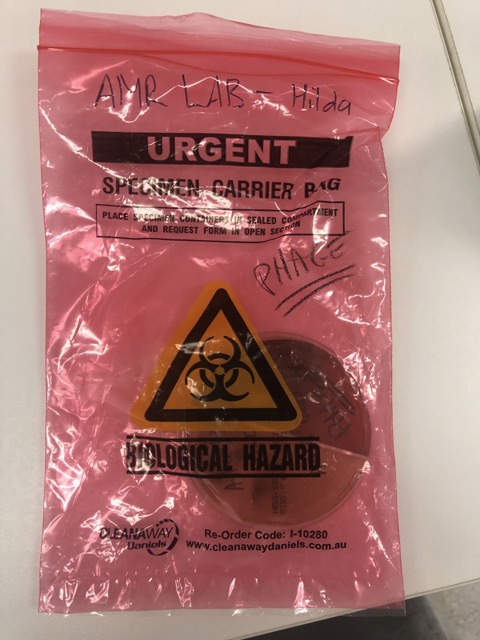
Figure 2: Each patient strain comes to us on a Petri dish inside a biohazard bag.
Stephanie in our group does this aspect. She picks up the strains, streaks them out, freezes them down into our Patient Strain Biobank (-80 Freezer). We give them each a code (e.g. CM0042_1, CM0042_2; patients’ initials, a numerical code corresponding to which patient case number they are, ie. 42 = the 42nd patient we’ve taken on, and the isolate number). (One time we got 17 different isolates from one patient! Usually we have about 2-4. If we have none, we use Phage Directory’s Phage Alert system to find collaborators who do.)
Now that we have the isolates, Stephanie does phage plaque assays on them. If it’s an E. coli strain, she tests all our E. coli phages (around 50) via a spot test. For any hits, she does a full dilution series and titre, looking for the 3-5 best hits that create individual, countable plaques (not just ‘lysis-from-without’).
For the best hits she does a growth curve: she cultures phage+host in 96-well plates, taking an optical density reading every 10 mins for 18 hours via a plate reader. She plots their growth and looks for whether any of the phages can suppress growth of the cells (looking for a ‘flatline’ ideally). She tests combinations of the phages, and various combinations of 2 or 3 phages, to identify any synergy or antagonism. She has controls with no phage, to benchmark against, and she runs each phage against the ‘propagating strain’ (more on this later), and each of the patient isolates. The goal is to find a set of phages that collectively suppress the growth of each of the patient’s isolates. Ideally, no more than 3 phages (since it’s hard for us to make more than that in a given month).
A quick note on biobanking
Biobanking happens at various points. First, the patient strains are banked (as described above). Second, the phages are banked (we have a collection that is ‘banked’ and a collection that is ‘in the process of being banked’; this is a subject for another day, but in essence, ‘banking’ to us means a phage has been isolated (3-6 passages) and demonstrated to be pure via sequencing (not a mixture; just one phage). Third, the phage propagation strains are banked (generally lab strains we’ve had for a while; we sequence these too). Fourth, the patient blood and serum samples are banked (we get these during patient treatment; for two weeks of treatment, there are blood samples collected over several days and sent to us — more on this below).
Sequencing of phage and production host
If any phage is chosen for a patient, but hasn’t been biobanked and thus hasn’t been sequenced, we do so at this time. Same goes for the phage host; we sequence the propagating (aka production) strain for each case too.
Phage production
Production is where we propagate/amplify the phages identified via diagnostics as the ones the patient needs. Usually there are 2-3 phages to make per patient. Stephanie gives them to me, lets me know which host they should be propagated on, and I use them to inoculate 350-mL cultures (in flasks).
Importantly, at this stage I give the cultures a batch number (e.g. Pae7_2_PAO1K_L230623, meaning phage Pae7, the second batch we’ve produced, host strain PAO1K, lysate (L) prepared on date June 23 2023).
After overnight growth I spin them down and filter them through a 0.22 um vacuum filter. I titre these and check if there’s enough to move to purification (we aim for 10^12 total pfu).
Phage purification
I first purify the phages through a process called Tangential Flow Filtration (see my post from last month: Getting our AKTA-gether: Using the AKTA Flux to purify phages for patients). This lets me concentrate them and get rid of media components (my phage lysate turns from yellow to clear, and goes from 350 mL to about 45 mL). This step takes about 5 hours including the prep and cleaning of the system.
I then put this concentrated phage prep through an Endotrap column — this is a kit we buy, and it works by affinity chromatography — endotoxin sticks to the column, and phage flows through. I capture the flowthrough as my final product. This step takes about 6 hours.
Verifying phage levels
At this point I titre my prep via plaque assay (along with several samples I collect throughout the TFF and Endotrap process; things like starting sample, permeate/waste, main harvested fraction (before and after filtering), and post-cleaning wash).
I am mainly checking if my final harvested product meets my minimum phage amount: we are going for at least 10^12 total pfu, but 5x10^11 is ok too. We usually don’t see much loss from TFF + Endotrap, around 1 log or less.
By titering all the samples throughout each process I am able to see where any losses might have gone, ie. phages coming out through permeate during TFF, or phages being lost during filtering that I do after each step, or phages still being left in the system after harvest, and coming out in the waste. I also use this step to demonstrate my cleaning is sufficient (should be no phages left after my cleaning steps!).
Next I calculate how many doses I have of purified phages: if my titre is 1 x 10^11 pfu/mL, and I have 45 mL, I have 4.5 x 10^12 pfu. We treat at 10^9 pfu/mL, so I divide total pfu I have by 10^9, and get 4,500 doses. I only need 28 doses per patient (2x daily, for 14 days), and need a few extra for quality testing (more on this later). But with 4,500 doses, I’m happy I’ll hit that and have plenty to spare (maybe even for other patients who end up needing this same phage in the future).
Verifying endotoxin levels
At this stage, if the titre is high enough, I do an endotoxin test to see if the endotoxin has been reduced enough that it’s safe for a patient. We aim for the FDA’s 5 EU per kg patient body weight per hour. So for a 70-kg person, 70 x 5 EU = 350 EU per hour.
We treat patients with 10^9 pfu/mL doses, and that’s delivered usually via IV over one hour, so we aim for 350 EU/mL in the diluted product.
If the endotoxin reading for my concentrated (10^11 pfu/mL) phage prep post-Endotrap is 4,000 EU/mL, I’d dilute 100-fold, meaning 4000 / 100 = 40 EU/mL — well below our target of 350 EU/mL! At this point we’d be happy to move forward with this prep.
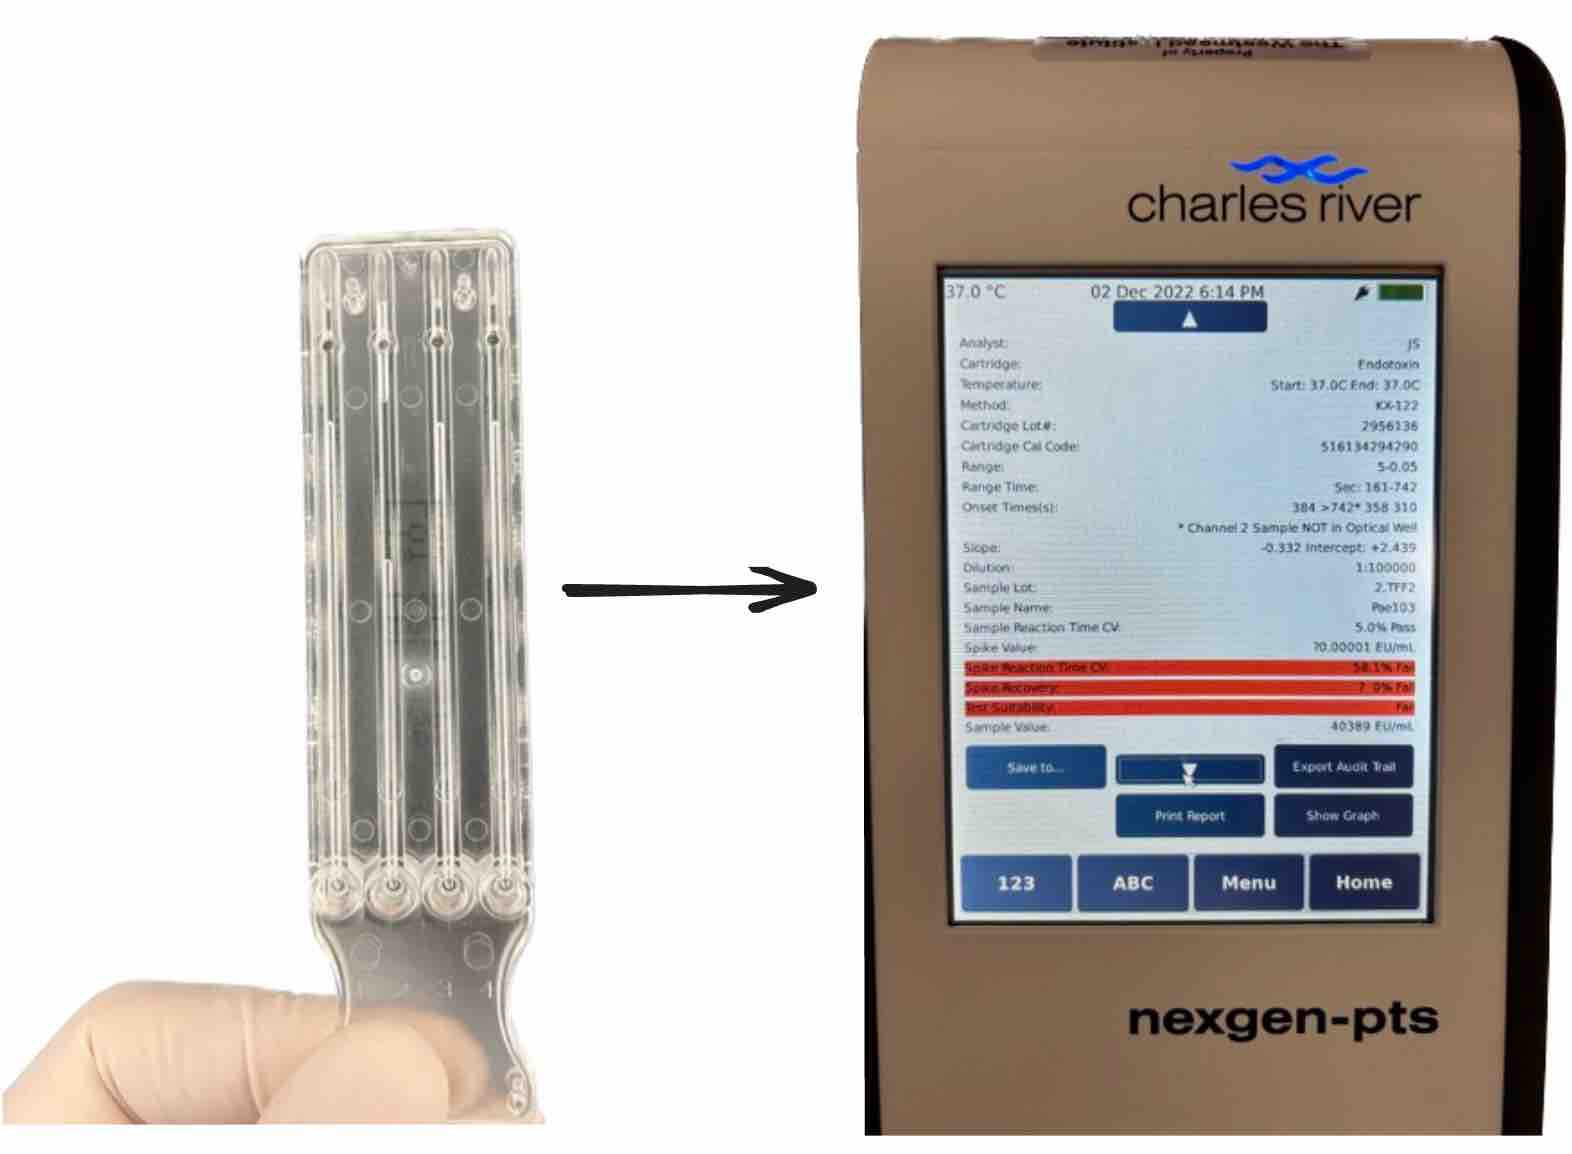
Figure 3: This is the endotoxin reader system we use: you pipette 25 uL x 4 into the wells at the bottom of a plastic cartridge, then insert it into the reader, which gives you a readout. It has internal standards built in, and as you can see in the above, this one failed. Common reasons for failing are that there’s too many components in the sample that inhibit the reaction (a limulus amoebocyte lysate assay, which uses a horseshoe crab enzyme that converts endotoxin into a detectable product). If it fails, you would usually dilute your sample and repeat until the standard, a known quantity of endotoxin which is pre-spiked into the wells, is detectable by the assay in the presence of your sample.
Sequencing of the final batch
If I meet my phage dose minimum and endotoxin maximum, as described above, I’d be passing my phage on to the next part of our pipeline: quality control (QC). This is currently done by Stephanie in our lab. I give her a concentrated aliquot of phage, and she does a suite of tests.
First, she extracts DNA for whole genome sequencing of the prep. We do this to check that there’s no contaminating phages at this stage, or evidence of bacterial contaminants that shouldn’t be there. We anticipate a bit of host DNA carryover from the propagation step. But for the most part we want to see only the phage we put in there. We submit for sequencing at a facility in our building; they do QC to check DNA quality, library prep, and run the sequencing reaction — they send the read data to our bioinformatician, Nouri Ben Zakour, who lives in Brisbane. She runs it through her pipeline (Phage Kitchen on GitHub). She lets us know if all looks good enough to proceed (what she does is a story for another day — maybe I’ll see if she’ll write about it here!). This process of sequencing + analysis takes about a week all-told.
Diluting and filtering to create the therapeutic product
Meanwhile, while waiting for the sequencing, we move on to formulation. We dilute the phage in saline or PBS, down to 10^9 pfu/mL, our target therapeutic dose. We check pH to make sure it’s approximately neutral. We then filter the product through a 0.22 um syringe filter.
Aliquoting into vials
We aliquot the diluted batch into individual glass vials, each containing one dose; usually 1-mL each (when phage is given intravenously), but sometimes 5-mL each (we do this when the phage will be given via nebulizer), or even 10-mL each (when phage is given orally).
Once aliquoted, we cap the vials and package sets of 30-40 doses into small boxes. For each batch, we set aside at least two vials to submit for sterility testing.
Sterility testing
We inoculate two blood culture bottles with 1 mL each of our final aliquoted product, and submit these for sterility testing through the hospital lab next door. They incubate the bottles and culture from them (one aerobically, the other anaerobically); then they let us know if anything grew each day for 5 days. Once our vials hit 5 days with no growth, we are clear to ship the phages to the patient.
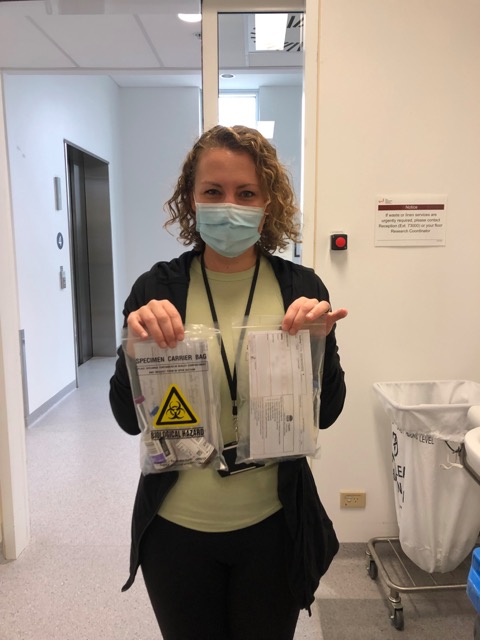
Figure 4: Sterility testing: this is me, ready to submit samples for sterility.
Labeling vials
We create individual sticker labels for each vial, and one label for each box the vials are housed in. We can’t create these until we have all the info from the quality control steps, so we leave it to the end. The box labels generally mirror the vial labels. (We have a GPT-powered tool for creating labels you can try here! https://labspace.ai).
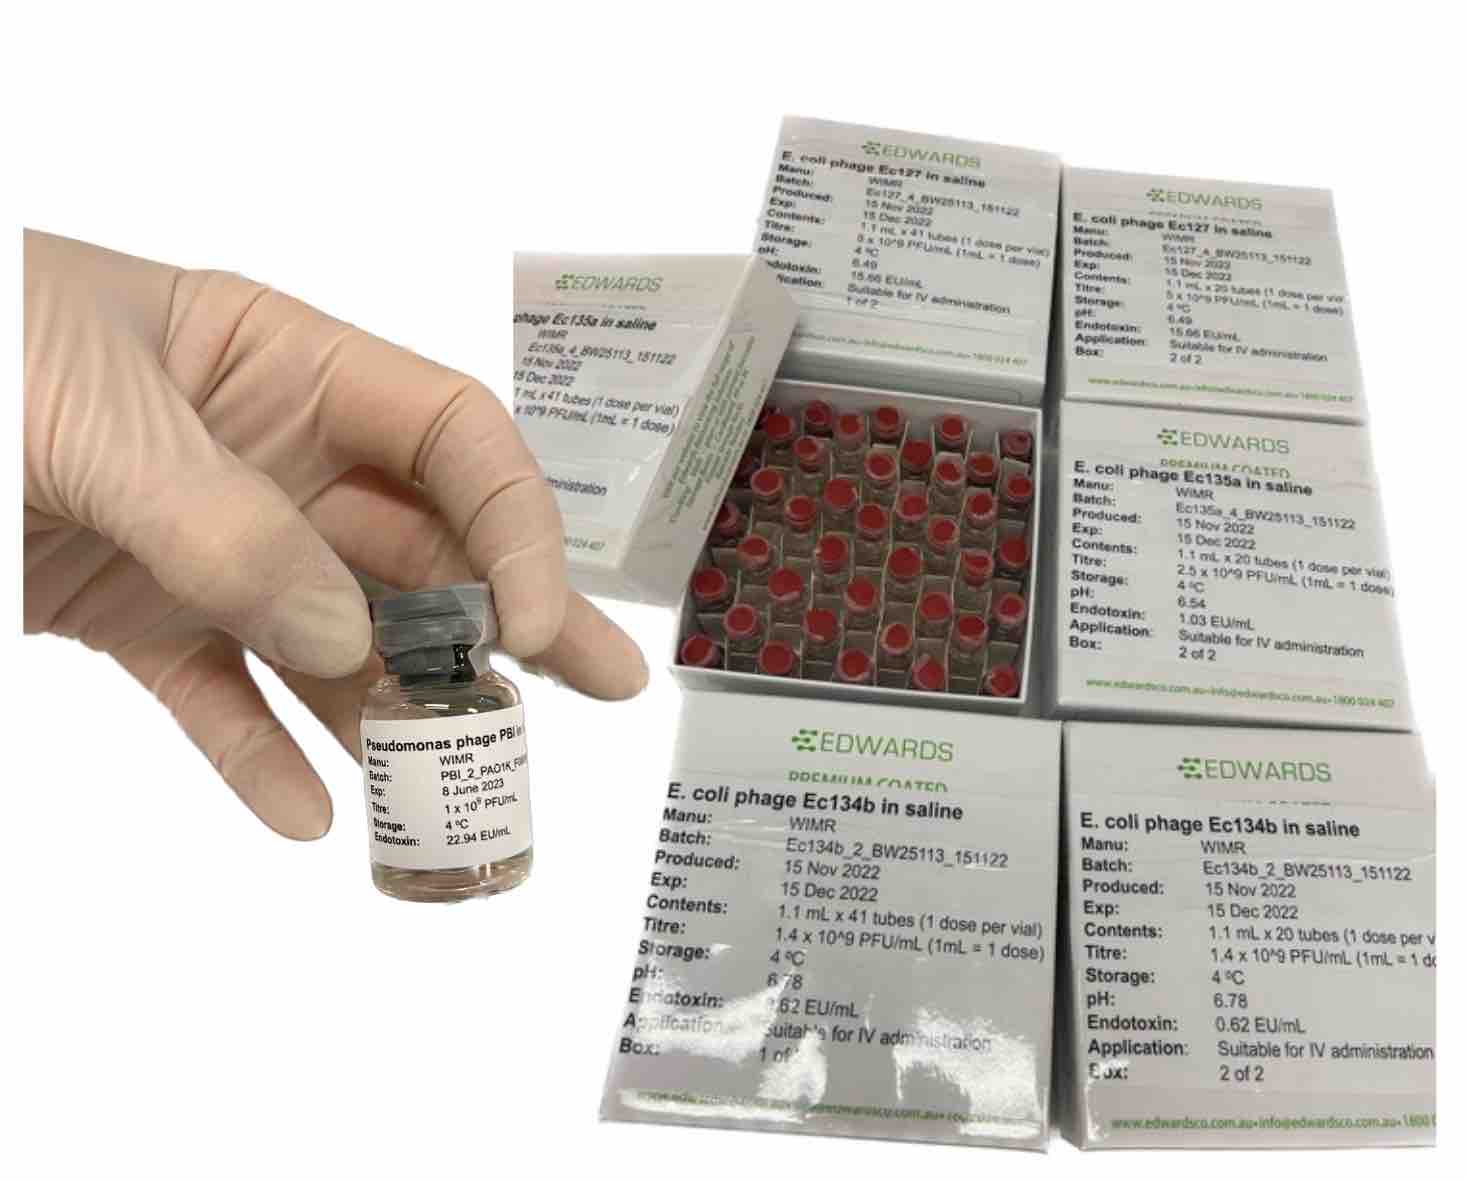
Figure 5: Labeled phage vials in boxes, ready to go to the patient.
Drug committee documents
At this stage we compile a set of four reports we send to the patient’s hospital drug committee ahead of the phages. The four reports are:
- Phage Passport
- Bacterial Passport
- Phage susceptibility report
- Phage batch report
The first two certify the safety of the phage and the propagation strain used to prepare the phage. Our bioinformatician Nouri contributes the bulk of what goes on these reports, which is a topic for another day, but mainly relates to identifying red flag genes like lysogeny, toxin and AMR genes, and demonstrating purity and identity of each phage and bacterial strain used.
The third is prepared by Stephanie after she’s finished the diagnostics for the patient; it details the phages that were selected, their efficiency of plating (on clinical isolates compared to their cognate propagating strains), and their growth curves with each patient isolate, both individually and in combination.
The fourth is prepared by me, Stephanie, and Nouri. I add the propagation and purification conditions, the titre and endotoxin values achieved. Then Stephanie adds in the other QC results (sterility, pH), and Nouri adds the final batch sequencing results (mainly aiming to demonstrate purity of the sample).
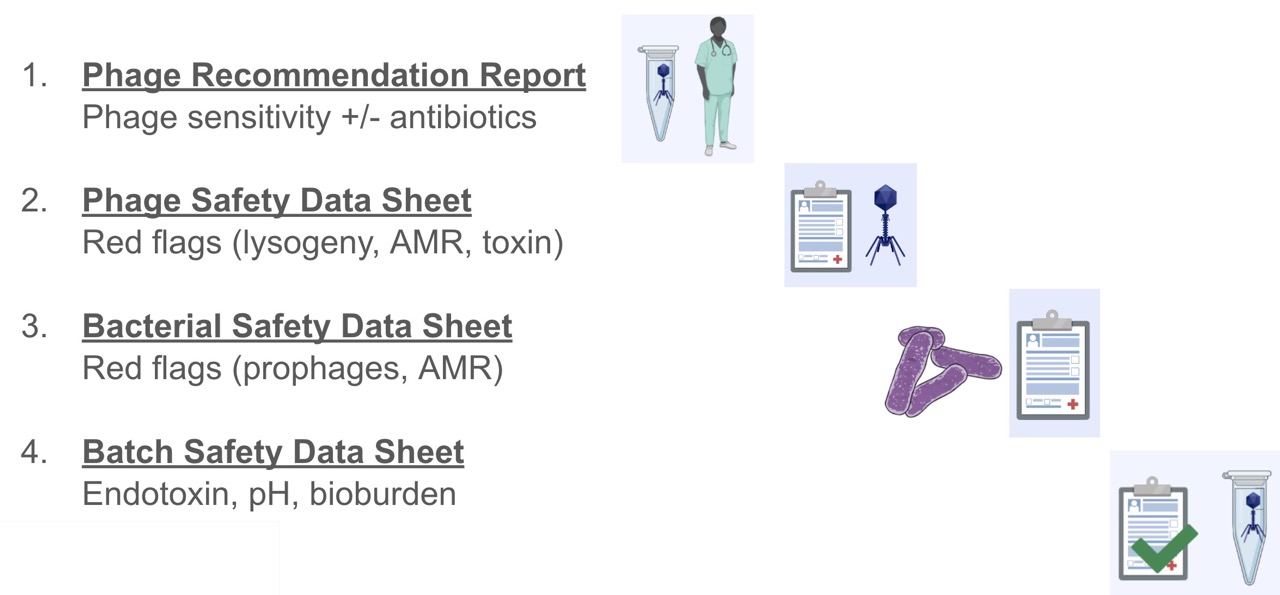
Figure 6: The four documents we submit with every patient phage prep to demonstrate the safety of the contents, as well as the data backing up the phage choice.
We package all this along with a copy of the STAMP protocol, two of the phage therapy papers our team has published in the past (Khatami at al 2021, Petrovic et al 2020), a cover letter written by our clinical team which is specific to the patient, including things like the reason the team believed phages were merited, which phages were chosen, and what was done to produce them.
Delivering the batch to the patient
We send 1 or 2 boxes of vials to the patient’s bedside. If they’re at our local Westmead Hospital or Sydney Children’s Hospital, which many are, we will walk the boxes over and give it to the nurses on the ward, who will store it in their drug fridge until use. If the patient is not local, we will use a courier (ie. a couple times we’ve shipped to Wagga Wagga, which is a small city 5 hours from Sydney). Stephanie arranges the courier to come pick up the phages, and we make sure to ship them cold.
Sample collection during phage therapy
Along with the batch of phage, the hospital gets a package of pre-labeled tubes they’ll use to collect blood samples to send back to us. This is the main way we go about monitoring the phage therapy treatment on the microbiology side. The team also of course monitors the patient’s clinical condition throughout treatment.
For monitoring, Stephanie on our team devised a system to help make it easier for the clinical staff to meet the sampling requirements and schedule laid out in our STAMP clinical trial protocol. It’s all colour coded so the staff knows to collect blood samples before and at two specified times after phage administration (30 and 60 mins). She sends the empty tubes in separate baggies according to each collection day (e.g. day 2, 4, 6, etc), along with a schedule and instructions so the clinical staff know what to do (collect blood on this day and this time; once collected, centrifuge and store under these conditions, send back to our lab at WIMR, etc).
Once we get blood samples (sometimes we get them the day they’re collected, other times we get one shipment of all tubes after the entire 2 week treatment course is done), we spin down the blood in the serum tubes they came in (if they haven’t been already), and aliquot into sets of 3 x 2-mL cryotubes (again, pre-labeled and colour coded to match the serum tubes, thanks to Stephanie’s system). We store these aliquots at -80 until we’re ready to process them.
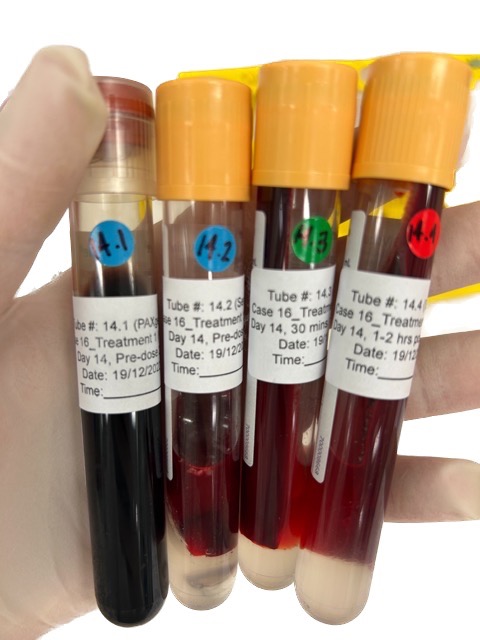
Figure 7: Blood samples collected from each patient during phage therapy. This is what one day of collection would produce.
qPCR to track phage therapy
We use qPCR to quantify phage and target bacteria over the two weeks the patients are receiving phage. I wrote about this in a series of two posts previously (here and here). To do this, we design qPCR primers for each relevant phage and bacterial species we want to track, and extract DNA from the serum samples we receive. Our team has published on this in the past (Khatami et al 2021, Petrovic et al 2020).
Additional monitoring
We also collect blood samples in PAXgene tubes (which are pre-filled with an RNA stabilization agent) for future RNAseq work. Our team has done this in the past (Khatami et al 2021, Petrovic et al 2020) and seen some human immune response-related gene expression signatures in past patients, and we’re curious if we’ll see the same in others.
Stay tuned for part II!
I’ll leave it there for now, but in part II I’ll get into how we’ve improved our efficiency as we’ve set up this process, how we divide up the work, how we hand from one person to the next, and some of the ways we manage expectations for turnaround time without compromising on safety. I’ll also get into some areas we see in our current process for improvement, and actionable insights for others starting up a bio-based service like this.
See you at Evergreen!
I’ll be presenting on this topic at the Evergreen International Phage Conference in a few weeks! Hope to see many of you there!
Further resources
- A talk I gave at Targeting Phage Therapy 2023 (Paris, France): Helping scale phage therapy, from Phage Directory to Phage Australia
- Labspace.ai: GPT-based tools for automating lab work, made by Jan and me; includes our Phage Australia vial labelmaker
- My blog posts on our Phage Australia processes & journey (2022-2023):
- Slides from a talk I gave on our Phage Australia process at the 2022 Bioprocessing Network Conference (Sydney, Australia)
- A poster I presented on our phage therapy pipeline at the 2022 Australasian Virology Society conference (Gold Coast, Australia)
- STAMP Study: Khatami, A. et al. (2022). Standardised treatment and monitoring protocol to assess safety and tolerability of bacteriophage therapy for adult and paediatric patients (STAMP study): protocol for an open-label, single-arm trial. BMJ open, 12(12), e065401.
- Phage Australia website: https://phageaustralia.org
- Paper by Khatami et al 2021: Bacterial lysis, autophagy and innate immune responses during adjunctive phage therapy in a child
- Paper by Petrovic Fabijan et al 2020: Safety of bacteriophage therapy in severe Staphylococcus aureus infection
- We didn’t come up with this system from scratch! It was inspired by:
- Phage physician desk reference (TAILOR Labs at Baylor College of Medicine)
- Queen Astrid Military Hospital (clinical triage flow)
- Sciensano (phage batch QC method; Magistral Phage)

