I’ve been curious about phage bioinformatics since the beginning of Phage Directory. We’ve hosted several PHAVES talks about it, I’ve met lots of great phage bioinformaticians (shout out to Evelien, Simon Roux, Bas, Ramy, Andy Millard, Nouri, Stephen Pollo, the CPT and TAILOR teams, and tons more people!), and I’ve learned a ton.
I’ll also admit that I find it all super confusing. If you told me to “do some phage bioinformatics” on a fastq file, it might as well be bioinforMagics. I understand the gist though — you take the raw files from the sequencer, assemble them into genomes, and run tools to identify “virus-looking parts,” and compare to similar “virus-y parts” to get the context of our sample. I get the concept, but I can’t put it to practice.
There are a ton of tools out there that tackle all parts of phage analysis, from assembly to virus identification and classification, but they don’t speak the same language (e.g. output and read the same files), so they don’t really work together. They also rely on different dependencies — like different programming languages and software — that can be a headache. To my understanding, bioinformaticians spend a large chunk of time kludging various home-grown tools together into a pipeline. I definitely don’t have the knowledge (or patience) to work with these.

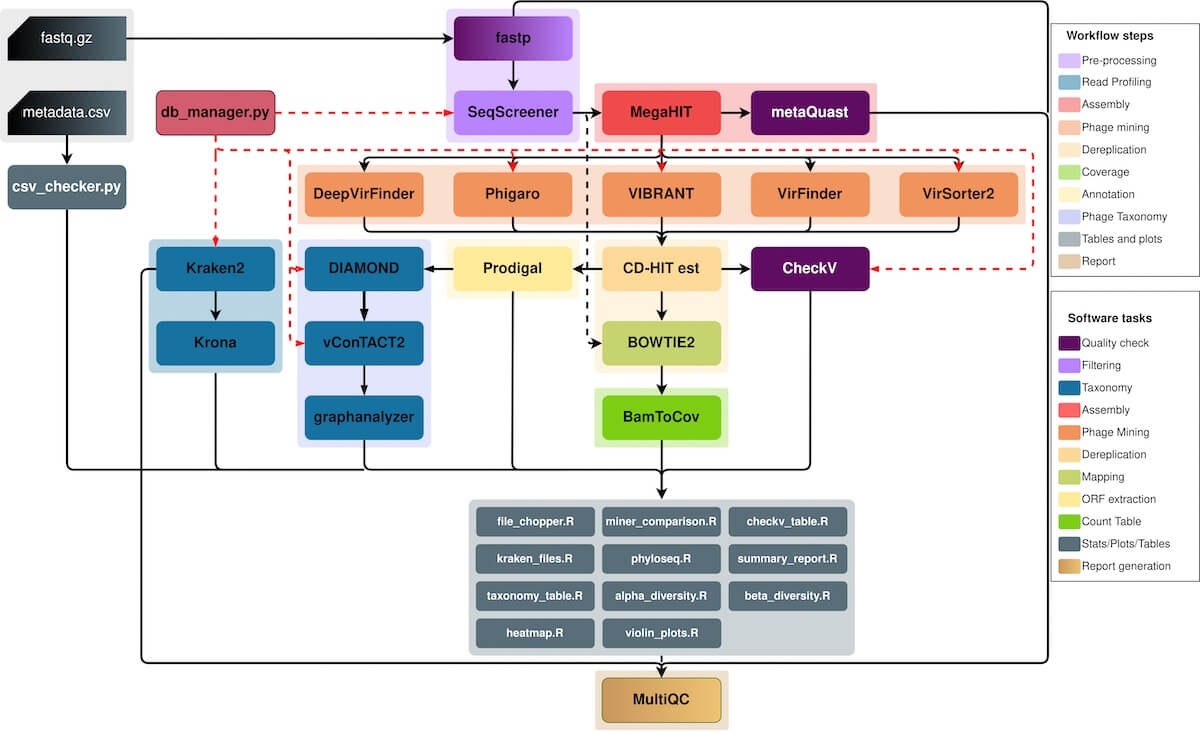
Figure 1. Flowchart of all the fancy tools MetaPhage uses to make sense of a sample. I have no idea what most of these do, but I trust they’ll get the job done. Source
This is where MetaPhage (MP) comes in. In the author’s words, MP is “a fully automated computational pipeline for quality control, assembly, and phage detection as well as classification and quantification of these phages in metagenomics data”. All that is to say — MP connects the various tools together in a way so you can just give it a file, out pops some understanding of the phage. This is a massive step in the right direction, as a tool like this will make it easy for anyone to run a “quick and dirty analysis” of any sequenced phage.
MetaPhage Resources
Paper: https://journals.asm.org/doi/10.1128/msystems.00741-22
Documentation: https://mattiapandolfovr.github.io/MetaPhage/
Github: https://github.com/MattiaPandolfoVR/MetaPhage
Docker Image: docker pull andreatelatin/metaphage:1.0
High-quality generated outputs
MetaPhage uses MultiQC to create an HTML report of the findings. This makes it easy for bioinformaticians to upload the data to the web — and for others to get access to the information. This means that bioinformaticians don’t have to painstakingly assemble graphs, plots and powerpoint presentations from scratch. The tool can just upload the HTML output to a server, and now the results are online.
Below is an example of the MultiQC output of a phage:

Figure 2. An example of the data that MetaPhage is able to output. View high quality screenshot | Visit the source to explore the full demo output
As someone with no background in bioinformatics or biology, most of this output is foreign to me, like reading a company’s quarterly earnings report but with no context of the business or its financials. I understand that these all say stuff about the phage, but I can’t really contextualize it. I can’t get from this report if a phage is able to infect a certain host, and encodes certain toxin-generating genes, or even really if it’s lytic or temperate, but someone more skilled might be able to?
This reminds me of weather apps. Weather data is messy, and weather forecasting is very, very hard. Yet, most weather apps and forecasters present the “narrative” of what the weather could be doing, to their best abilities, with a decent level of confidence. As long as they also report their level of confidence, I’m going to take their word for it. Of course, I’ll have the additional ability to dig into the data like pressure, wind systems, satellite imagery, etc. etc. but most of it’s meaningless to me, as a non-meteorologist. This is what I think bioinformatics tools could move towards — adding layers of abstractions run with scripts with reasonable defaults, for those less familiar with the field and who want a quick answer. This has a benefit of leaving bioinformaticians more time and energy to answer the harder biological questions (instead of being flooded with simple but time-consuming requests from biologists).
On the path to One-Click phage analysis…
MetaPhage is exciting because it takes all the grunt-work of setting up and connecting the tools out of the picture. It’s like buying a car without needing to assemble the parts. You can just turn the key and drive. Software that’s easy to use is usually referred to as having a good user experience, or good UX. Similarly, “good user experience” also exists for software meant to make software development easier. This is called DX, for developer experience.
The software engineering world is full of tools that makes writing software easier — a long time ago I worked with Microsoft’s Visual Studio team, a tool designed for developers to more easily write code. The biology and bioinformatics world is sorely lacking in these tools, but Metaphage and a few other tools like KBase.org, BV-BRC (formerly PATRIC) and Galaxy are setting out to change that. These are starting to provide a better BX (bioinformatician experience?), and that’s exciting for newbies to the field like me.
…but one step at a time
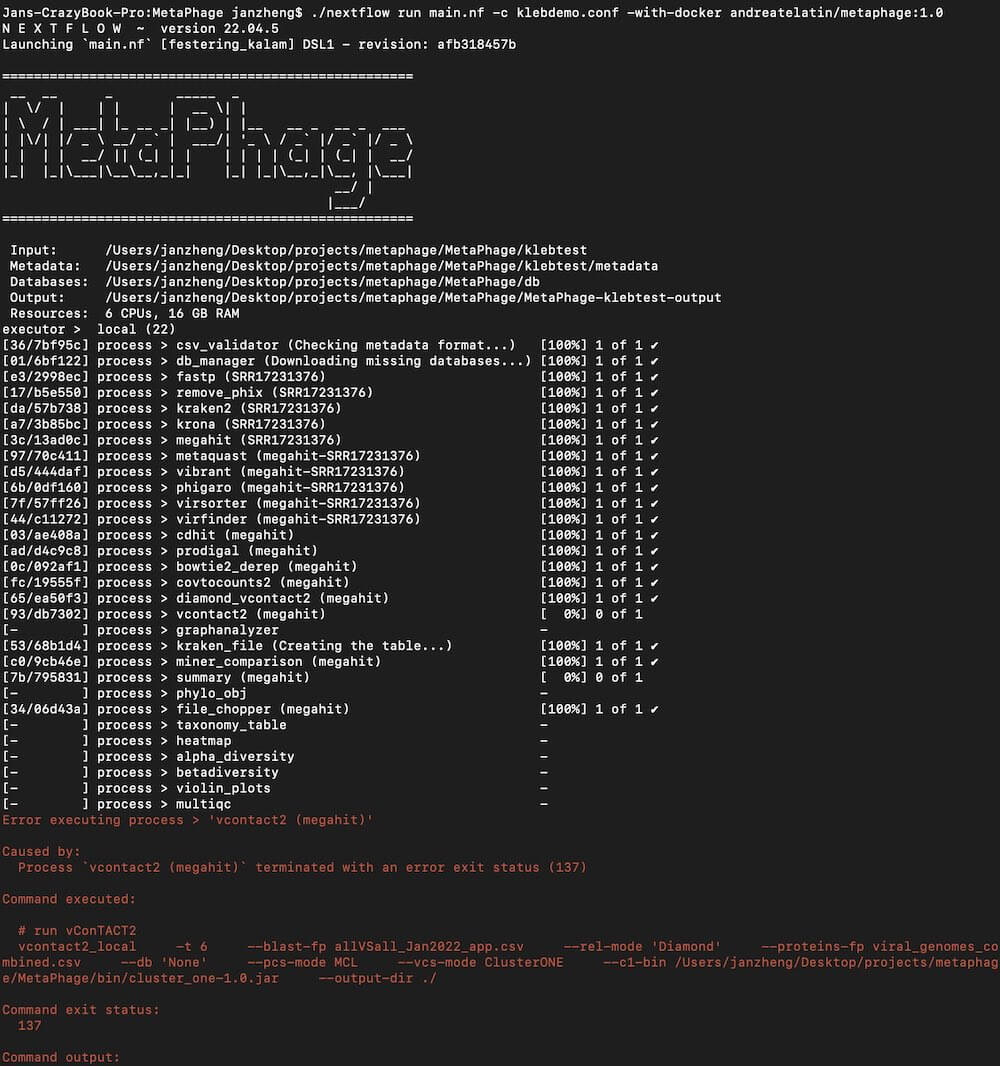
This article started out as a “How to get started with MetaPhage” tutorial. I was going to get it running on my Macbook Pro, take screenshots along the way, and do a writeup of how I got my first phage analyzed. After six hours of set up, 10+ hours of running on a single 30MB phage sequence file, I was ready to create a successful phage report… only for MetaPhage to crash because I messed up the configuration file!

Figure 3. This error came from a misconfigured config file. 100% my error, but there goes 10 hours of computation time. And it crashed at the very, very end. Oops!
I think I fixed the file, but it seems like MetaPhage will restart the entire process. One of the most annoying aspects of software engineering is making sure all the configurations are correct. You might have seen big web service providers like Amazon AWS, and Github go down for several hours at a time, or Atlassian go down for several weeks — all because of incorrect config files. It seems like bioinformatics is the intersection of wrestling with config files, dealing with brittle underlying scripts, and working with the general uncertainty and complexity of biological systems. It’s really hard!
Trying this at home requires patience…
If you do want to try it at home, the requirements for MetaPhage are quite high. Ideally you should have at least 80GB of free space. Nextflow, Docker, and the databases require about 35GB of space, plus another 35GB of swap space, for files to copy over. Each run seems to output around 2-3GB of files. MetaPhage also highly recommends a 16 core CPU with at least 64GB of RAM (the documentation says “required” but you can work around this). I ran this on my 2019 Intel CPU Macbook Pro, with 6 cores and 16GB of RAM, which is woefully inadequate. I think if I got a Macbook with an M2 Pro or Max processor it’d go a lot faster. Of course it’d be much faster on cloud compute, cluster or HPC!
Much technical documentation assumes background knowledge, and more or less ends up being a “draw the rest of the owl” meme. I’ll try to fill in some more context in my writeup.
Here are my notes and files for running MetaPhage on a Mac. Remember, I didn’t get it running correctly, so your mileage may vary here. MetaPhage doesn’t work on Windows, sorry.
But if something doesn’t make sense, remember to Read the Fantastic Manual: https://mattiapandolfovr.github.io/MetaPhage/
OS Requirements: Linux or Mac OS environment; I’m on MacOS Big Sur
Disk Space Requirements: At least 80GB for swap space, DB downloads, and apps such as Docker. I had 50GBs initially and ran out of space at the DB download step. Plus, Nextflow seems to create a work folder for file caching, which is an additional 27GB. I then moved several files off to an external hard drive and freed up 150GB of free space, which seems more than sufficient.
Ideal Hardware Requirements: 16 core CPU, 64GB RAM; I’m on the last Intel CPU, but an M2 Macbook Pro might work. No idea, but let me know if it does.
General Steps + Getting Software Requirements for MacOS, using Docker:
-
Download, install, set up, and run Docker App for Mac: https://docs.docker.com/desktop/install/mac-install
-
Download and install Java. This is required for Nextflow. I like the Open JDK version here. I chose “OpenJDK 16” for MacOS x64. There’s no ARM option for M1 and M2 processors yet, but this option should still work: https://adoptopenjdk.net/archive.html?variant=openjdk16&jvmVariant=hotspot
-
Open the Terminal. If this is your first time, go to Spotlight (or CMD+Space) and type Terminal. Hit enter. brew and wget are useful tools for your Mac, and are essentially “free app stores” allows you to install apps like Nextflow, python, etc.
- Install Homebrew by pasting this into Terminal, and hit enter:
/bin/bash -c "$(curl -fsSL https://raw.githubusercontent.com/Homebrew/install/HEAD/install.sh)"
- Download and install
wget using brew, by pasting this into Terminal and hit enter: brew install wget
-
Now you’re almost ready to get started. Let’s get the folder and Nextflow set up.
- Create a new folder (I created a folder on desktop called MetaPhage), and navigate to this folder in terminal. If you created a MetaPhage folder on Desktop, type this to navigate:
cd $HOME/Desktop/MetaPhage
- Download and install Nextflow, which is a system for writing computational data pipelines for fields like bioinformatics. Copy, paste, “enter”:
wget -qO- https://get.nextflow.io | bash. This should result in a nextflow executable appear in the folder. If this step fails for you like it did for me: go to Apple logo (top left) > System Preferences > Security + Privacy > Full Disk Access > click the lock icon (bottom left) and grant full access to Terminal. If the wget command keeps failing, try curl: curl -s https://get.nextflow.io | bash
- Now, check if Nextflow is running properly by running the tutorial demo. If you haven’t worked with text files, I highly recommend downloading Sublime Text: https://www.sublimetext.com/blog/articles/sublime-text-4. This lets you easily create, inspect edit text files like scripts and code.
- Create a new file in the MetaPhage folder called
tutorial.nf and copy the tutorial code as described in “Your first script” from the Nextflow documentation. In terminal, type nextflow run tutorial.nf to run the tutorial. You should see “HELLO WORLD!” appear. If it’s not working, try adding ./ to the commands. This tells the system to find the relevant files from within the same folder, e.g. ./nextflow run ./tutorial.nf
-
Ok now we’re finally ready for MetaPhage! Let’s download Metaphage as a Docker image. This is what Nextflow will use to run MetaPhage. This is a ~2GB download, and roughly ~6GB when installed. Copy, paste and “enter” this to terminal: docker pull andreatelatin/metaphage:1.0
-
The next few steps requires you to download quite a few things to set up MetaPhage: the Github repo with all the scripts (300MB), the databases required for MetaPhage (~34GB), the MetaPhage demo files (~6GB), if you want to run the demo. This is way too big of a run for my laptop to handle though, so I created my own smaller test (which failed to run, but my config might get you started).
Note: to save you (and future me) some time, I’ve created a zip file of the MetaPhage Github folder, with all necessary databases downloaded, and the failed demo run file. (I’ve removed the official demo to save on space). This zip file is 15GB compressed, and the folder is 35GB decompressed.
Grab it from my Dropbox, to save you the effort from doing the next few steps: https://www.dropbox.com/s/zdx7m88zwyexd7n/MetaPhage-Starter.zip! Don’t forget to edit the configuration files (.conf) parameters to fit your system! Otherwise, here are the steps to reproduce:
- Download and install Github CLI (command line interface). Github CLI lets you download code repositories from Github. This is useful if you want to get the source scripts for MetaPhage. Copy, paste, “enter”:
brew install gh. Then clone the Github folder into your current MetaPhage folder: gh repo clone MattiaPandolfoVR/MetaPhage .
- Download the necessary databases for Metaphage (~34GB). Remember you need ~70GB for swap space before you download or it might fail like it did for me, and then you have to restart the download… Here’s how to grab them:
./bin/python/db_manager.py -o ./db/ -m 6
- Get the MetaPhage example if you want. It’s 6GB. For reference, a 35MB example took my laptop 12 hours to run. This would take about 240 hours to run. Good luck lol. To get the example:
-
Download example from script: ./bin/getExample.py --verbose -t 8
-
Create the config from script:
python ./bin/newProject.py -i demo \
    -m demo/infant-metadata.csv \
    -v Infant_delivery_type \
    -s demo.conf
-
Run the example with Docker: ./nextflow run main.nf -c demo.conf -with-docker andreatelatin/metaphage:1.0
-
Now you’re ready to run your own example! I just grabbed a random Klebsiella phage called “FairDinkum” (from Andy Millard’s lab) from NCBI’s Short Read Archive: https://trace.ncbi.nlm.nih.gov/Traces/?view=run_browser&acc=SRR17231376&display=download
-
Create a folder, klebtest and move the fastq file in there. Here’s probably where I’m going wrong, so this might not work from here on out. This is probably where I messed up: you need to duplicate the fastq file and give each the name SRR17231376_1.fastq.gz and SRR17231376_2.fastq.gz Here’s where my lack of bioinformatics knowledge shines, as I don’t know why there are two read files, or really how the mechanism works. But I also don’t know why SRA only gives you one file to download.
-
Create a metadata in the klebtest folder with a csv file with this, just as a test:
Sample, Source_URL
SRR17231376, https://trace.ncbi.nlm.nih.gov/Traces/?view=run_browser&acc=SRR17231376&display=download
-
Create a klebdemo.conf file with the configurations. Notice the max_cpus and max_memory params:
params {
    max_cpus = 6
    max_memory = 16.GB
    max_time = 72.h
    config_profile_name = 'Mini Klebsiella Phage MetaPhage project'
    config_profile_description = 'MetaPhage analysis configuration'
    // INPUT PATHS
    readPath = "/Users/janzheng/Desktop/projects/metaphage/MetaPhage/klebtest"
    fqpattern = "_{1,2}.fastq.gz"
    metaPath = "/Users/janzheng/Desktop/projects/metaphage/MetaPhage/klebtest/metadata"
    dbPath = "/Users/janzheng/Desktop/projects/metaphage/MetaPhage/db"
    // OUTPUT/WORKING PATHS
    outdir = "/Users/janzheng/Desktop/projects/metaphage/MetaPhage/MetaPhage-klebtest-output"
    temp_dir = "/private/tmp"
    // METADATA
    metadata = true
    virome_dataset = true
    singleEnd = false
    src_url = "Source_URL"
}
-
Change the nextflow.conf file’s params setting to also include max_cpus and max_memory. You might also need to change everywhere cpus = # to match your # of CPUs. Note that the number of CPUs and memory should match the memory allotted in Docker. To increase that allotment, open the Docker App > Preferences. Do NOT increase the CPU count all the way to the right. It’ll make things extra painful for you. **This is crucial as this lets Nextflow and MetaPhage to make an exception for my rinky dink machine. This also means you’re going to wait a really long time for MetaPhage to finish, but hey at least it runs!
-
Ok now you’re ready to run the demo. Type this: ./nextflow run main.nf -c demo.conf -with-docker andreatelatin/metaphage:1.0 and it should run! Wait 12 hours and hope your run doesn’t crash! If you’ve figured out where I’ve gone wrong, please tell me ([email protected]), so I can improve this writeup later on.
Parting Thoughts
If MetaPhage makes phage bioinformatics much, much easier, I don’t want to know what it’s like without MetaPhage. It moves the entire field towards the direction of one-click phage analysis where time and energy should be spent on analyzing results, not on stringing the tools together. Even though getting MetaPhage and Nextflow running properly isn’t a trivial task today, MetaPhage and tools like KBase.org, BV-BRC (formerly PATRIC) and Galaxy are making great strides towards user-friendly phage analysis and bioinformatics.
With that said, though MetaPhage lets someone like me run these tools, I still lack the deep understanding of biology and bioinformatics to make sense of any of the data output. Easy-to-use bioinformatics tools are still not a replacement for understanding the underlying biology, statistics, and data analysis. Seems like we can’t get rid of our resident bioinformaticians quite yet!
MetaPhage Resources
Paper: https://journals.asm.org/doi/10.1128/msystems.00741-22
Documentation: https://mattiapandolfovr.github.io/MetaPhage/
Github: https://github.com/MattiaPandolfoVR/MetaPhage
Docker Image: docker pull andreatelatin/metaphage:1.0


