A version of this post was published earlier this week on Jessica’s TechBio Adventures.
Omg you guys! I coded! And I made something useful — a chatbot that knows everything we’ve ever published here in Capsid & Tail. Here’s how I did it, how you can play with what I built, and how you can build your own. And lastly, why I think the fact that I could do this at all, as a non-coder, in a single weekend, has massive implications…
You’ve probably all heard about ChatGPT by now. And about large language models in general. It’s the talk of the town! And like anyone with at least one tech-savvy friend, I too have heard about little else for weeks now.
I was a huge fan of it from the beginning — who wouldn’t be; it’s magical. Gradually, ideas started bubbling. Could this thing write emails for me? Help me write blog posts? Help me troubleshoot experiments? I played around with it and found a ton I could do (even science-related stuff, like turn my messy notes about my experiments into clean bullet points and even a flowchart!).
Needless to say, I was hooked. Meanwhile, my partner Jan was working with ChatGPT on another level. As a programmer, he was diving into giving ChatGPT more superpowers than it already had. For example, he found a way to give ChatGPT my entire 300-page PhD thesis on Campylobacter phage glycosylation, then have a chat about it.
This was pretty crazy, given I’d already encountered the word limit on ChatGPT (like many of us, I presume). How could I get these superpowers? How could I give ChatGPT a lot more information, such as access to my lab’s research papers, so I can quickly check which strains or mutants we’ve tested in a particular assay, or quickly grab one of our methods based on a quick question instead of opening a bunch of files and using control+F a bunch of times. Could I give ChatGPT a new paper and get it to explain it like I’m 5? Could it ingest a bunch of papers on cloning and act as my personal cloning wizard friend?
I expressed this to Jan, and he was way ahead of me. “Yes, you need to do this tutorial. Right now.”
Ooh! A tutorial! I opened this, and made this face 😱:
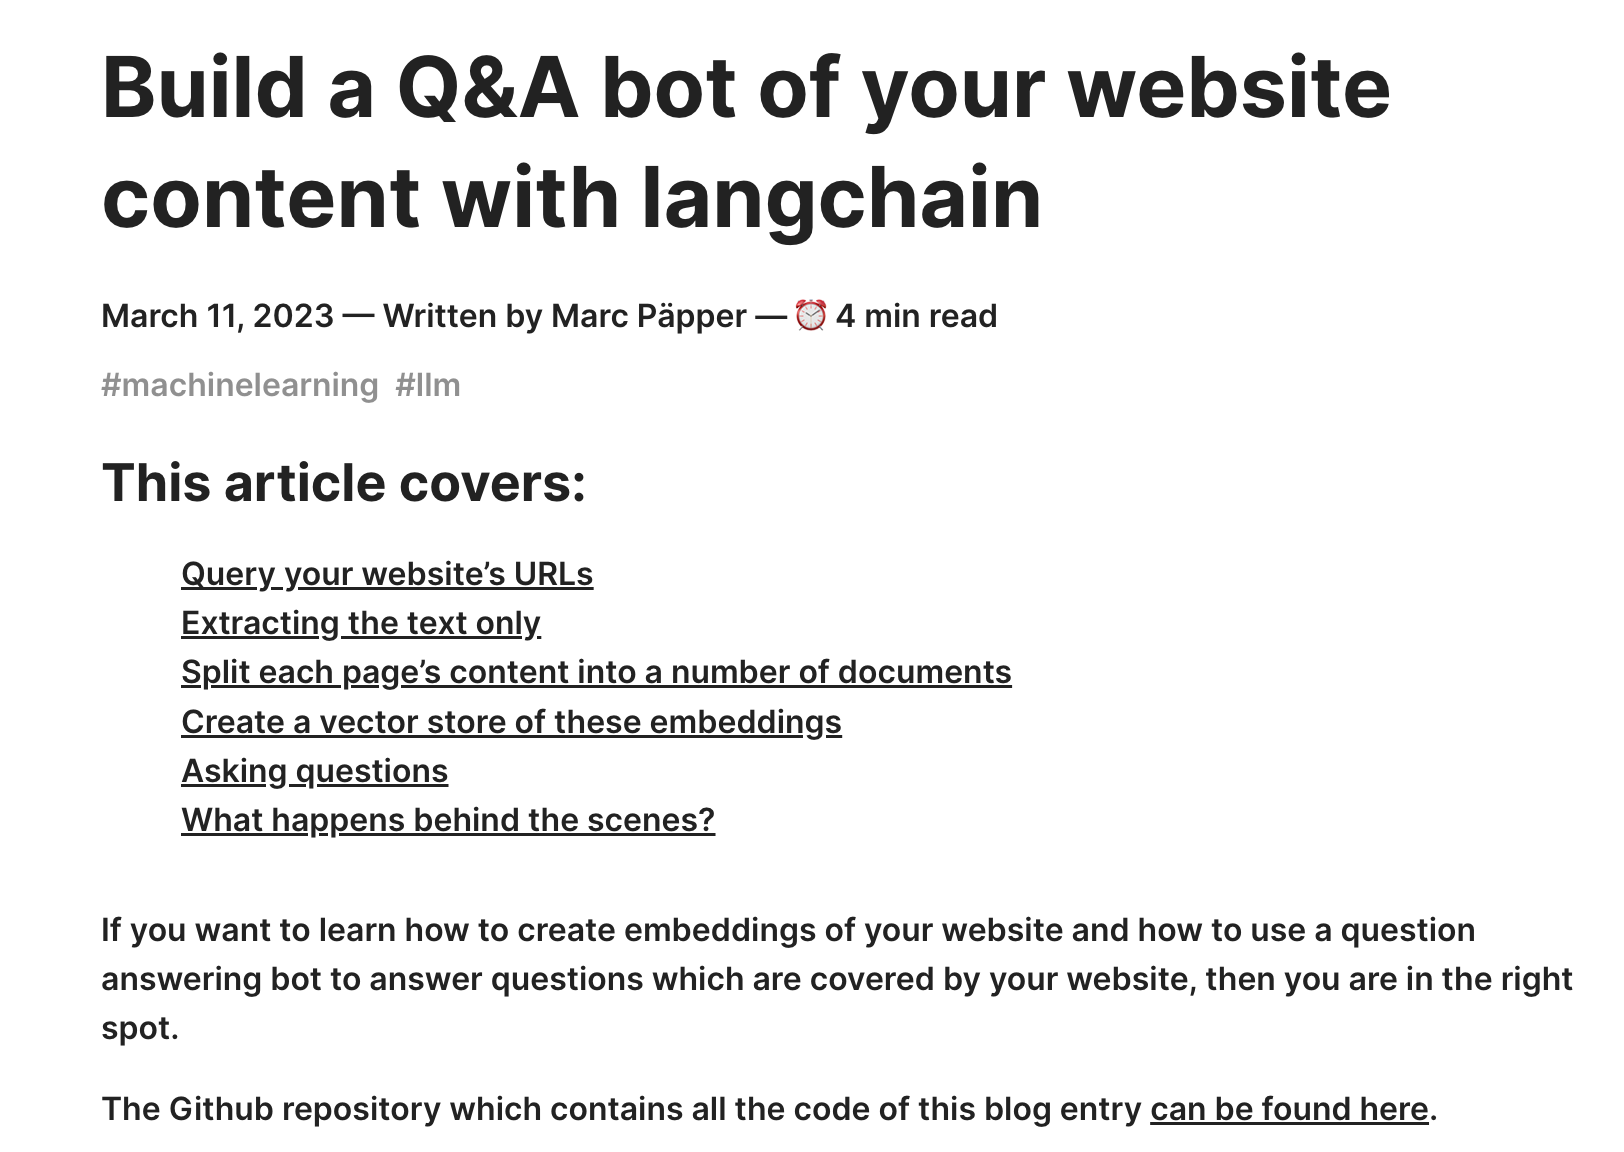
It seemed cool based on the title of course. I’d love to be able to build something like that. But why did it have to use words like ‘embeddings’ and ‘vector store’? Why would Jan think I would be able to do this tutorial? I can’t code / had only really done Codecademy basics (one of my pandemic hobbies I took up for a while and then set back down)…
Jan said, “Do it. This is the Next Big Thing. Ask ChatGPT if you get stuck.”
I decided to try. I figured this could be like when I learned knitting by forcing myself to start with a weirdly hard pattern because the lady at the yarn store said it was ‘for beginners’, and I believed her. She said ‘use youtube if you get stuck’. (Fun fact, thanks to the million knitting youtube videos, not only was I was able to do it, but the knitting pattern creator lady even asked if she could add my finished scarf to her pattern page on Ravelry.com!! Life highlight).
Flashback to when I became Ravelry-famous
So I decided to press on and hope for a similar outcome with this… Worst case scenario, I’d learn something about coding, and see if I could actually do it / might like it. Best case, I’d unlock the power to give ChatGPT superpowers, which I could use to help me as a scientist/startup founder.
Struggling through a ‘build a chatbot’ tutorial with ChatGPT’s help
First I tried following the tutorial by Marc Päpper. I saw that the first step was to ‘use the website’s sitemap.xml to query all URLs’. Hmm, what is a ‘sitemap.xml’? I asked ChatGPT, who said it was a list of URLs on a website, and said you could look it up for any website (though it may or may not exist). I tried to get ours for phage.directory as a test… but try as I might, I couldn’t. I wasn’t about to tell Jan, as I didn’t want him to help me yet…
Instead of solving that issue right away, I changed course and decided I’d try to do the tutorial with the author’s site map, since he seemed to have one. I just wanted to see if I could replicate what he’d done. This turned out to be a good plan.
Before one can code, one needs an ‘environment’ to code in…
The next step in the tutorial was ‘Download the HTML of each URL and extract the text only’ and the picture showed a bunch of code. 😱
Deep breath. Ok cool, the code is there, I can copy it and use it. Now I just need a place to type the code into. Back in 2020, during a pandemic-induced intro coding course, I had been exposed to Codecademy’s interface, and a bit of Jupyter notebooks… I’d also taken an ‘intro to bioinformatics’ course once (circa 2016) which had resulted in some scary times working in the Terminal. I remember liking how Codecademy and Jupyter notebooks had friendly-looking text boxes which let you type code and hit ‘run’, and then you could see if the code worked. I wasn’t sure if I could use them to start something of my own.
I then remembered that Packy McCormick, my fave internet writer, had said that he had recently tried building an app as a beginner using something called Replit.
I decided to try that — maybe that would be a beginner friendly way I could start to code?
I went to repl.it and got an account. I then opened a new Replit project and tried putting in some of what the tutorial said. I typed in the first two lines of code in the tutorial (even though I hadn’t the faintest clue what they meant) and pressed run.
Of course, an error. The error meant nothing to me, so I asked ChatGPT about it. It said something about how the code I had pasted was supposed to be run in the Terminal. Ahh! Not the Terminal…
So I opened the Terminal application on my mac and typed it in there. Error! The Terminal did not like those lines either (surprise surprise). (Something about needing to have ‘packages installed’.)
So Replit couldn’t run things the Terminal was supposed to run. And Terminal couldn’t run those things either. I then found a place in Replit called ‘Shell’. According to ChatGPT, Shell is the Terminal for Replit! Thanks, pal! But alas, no, trying to run those lines didn’t work in the Shell either. I still got an error. And ChatGPT’s help was not helping.
Getting help from a human
Around this time, Jan saw me ‘coding’ (lol) and made me tell him what I was stuck on. He told me about coding ‘environments’ and how the Terminal relates to coding… I caught some of it before my brain starting turning to mush. What I took away was essentially, that the Terminal can be used to installs things that can run code. Once you’ve installed those things, then you can use the Terminal to run the code. Code, meanwhile, lives in files, waiting to be run. You don’t generally want to use the Terminal to write the code (it doesn’t really save things). Instead you should write and save the code in files. And then you should use Terminal to run that code.
My brain went to a biology metaphor, and so far it has not failed me: think of Terminal as a ribosome, and code as mRNA.

Anyway, Jan then gave me a golden piece of advice, which I now pass on to you; he said that to get started, I should use Google Colab. He said this is like a coding ‘environment’ that has Terminal built in — I write the code, and there is a button I can press to ‘Run’. Yay! This is what I wanted.
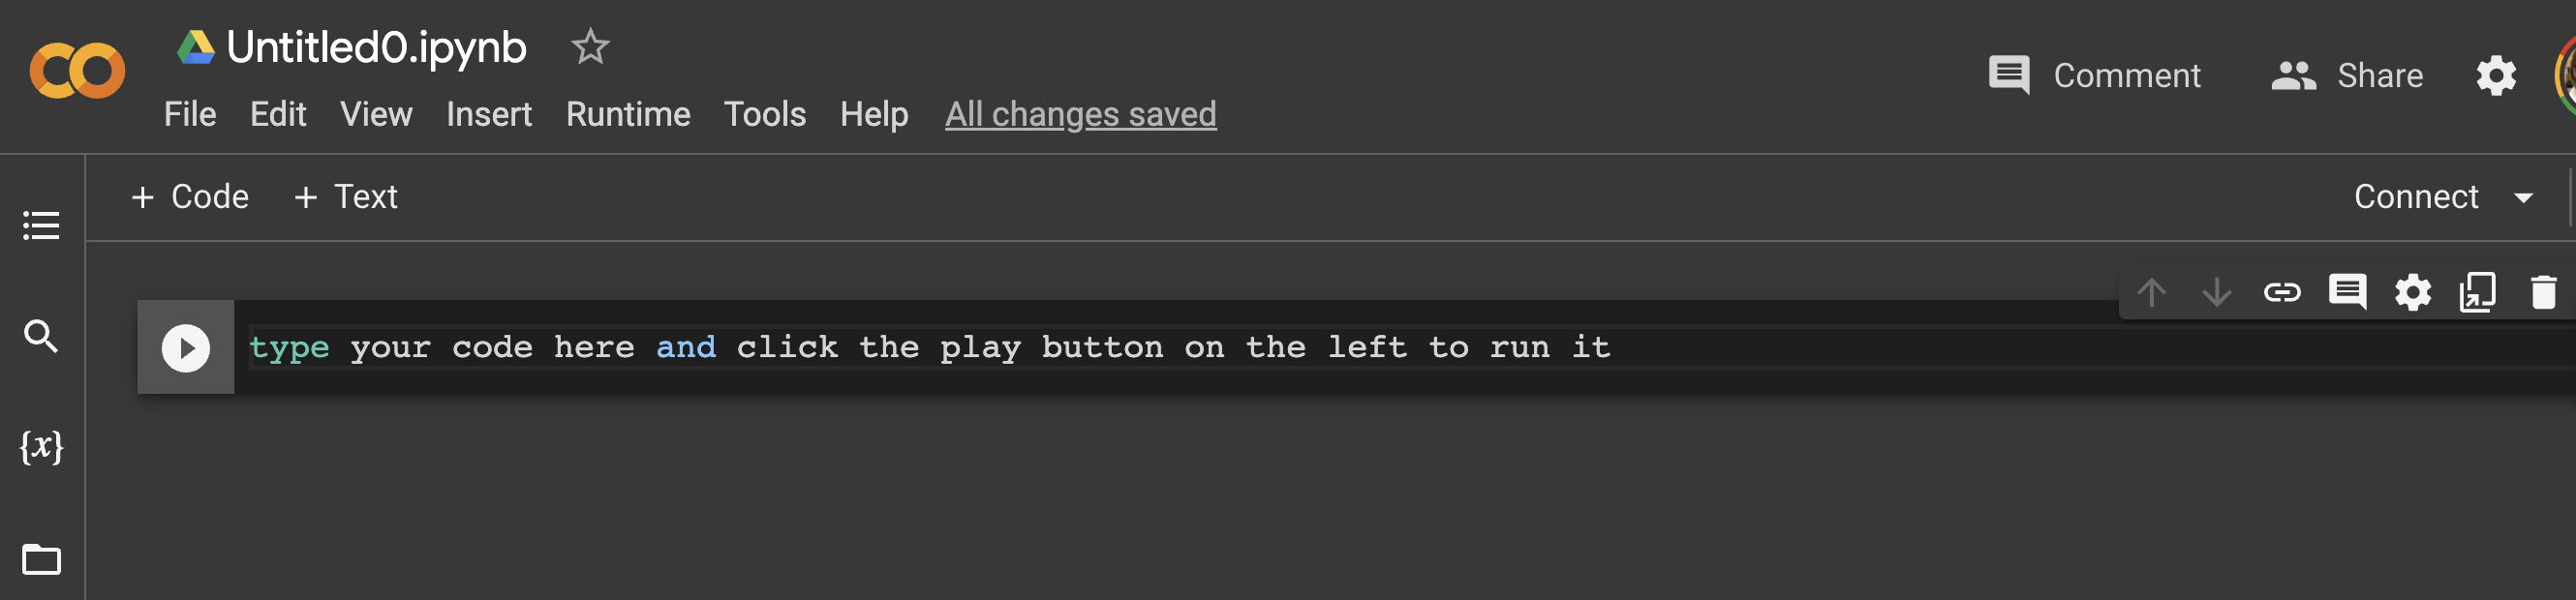
Getting Google Colab up and running
Creating a new Google Colab notebook is as easy as creating a new Google Doc.
Here’s what a Google Colab notebook looks like. A place to write code, next to a ‘play’ button that you click to run it.
Nuggets of wisdom revealed by constantly pestering ChatGPT
Switching to Colab didn’t solve my problems right away. But as I continued to paste in my tutorial code, line by line, and continued to paste in each error message I would get, I was able to get myself unstuck. I think this is in part because ChatGPT seems to know a lot about Colab specifically, and could offer special tips and tricks.
For example, ChatGPT enlightened me on what I’m calling the ‘exclamation mark rule’. Anytime you get an error saying ‘you should be running this in terminal’, you put an ‘!’ in front of the code and rerun it, and it (should) fix the problem — it now acts like you’re typing in Terminal. Amazing! So I could finally run those Terminal commands I wanted to run from the beginning.

ChatGPT giving me sweet tips. Thanks, friend!
Ok, so we’re back in business — ready to continue attacking this tutorial. We’ve made it past the first couple lines without getting errors. From here, I basically just repeated this process:
Type tutorial code into Colab → get error → paste error message to ChatGPT → get possible solution → fix code, or paste new code into Colab → repeat until it works (no error)
Example of how I would ask ChatGPT for help with error messages. First, I’d just paste in an error. No context. Then I’d ask followup questions until something made sense.
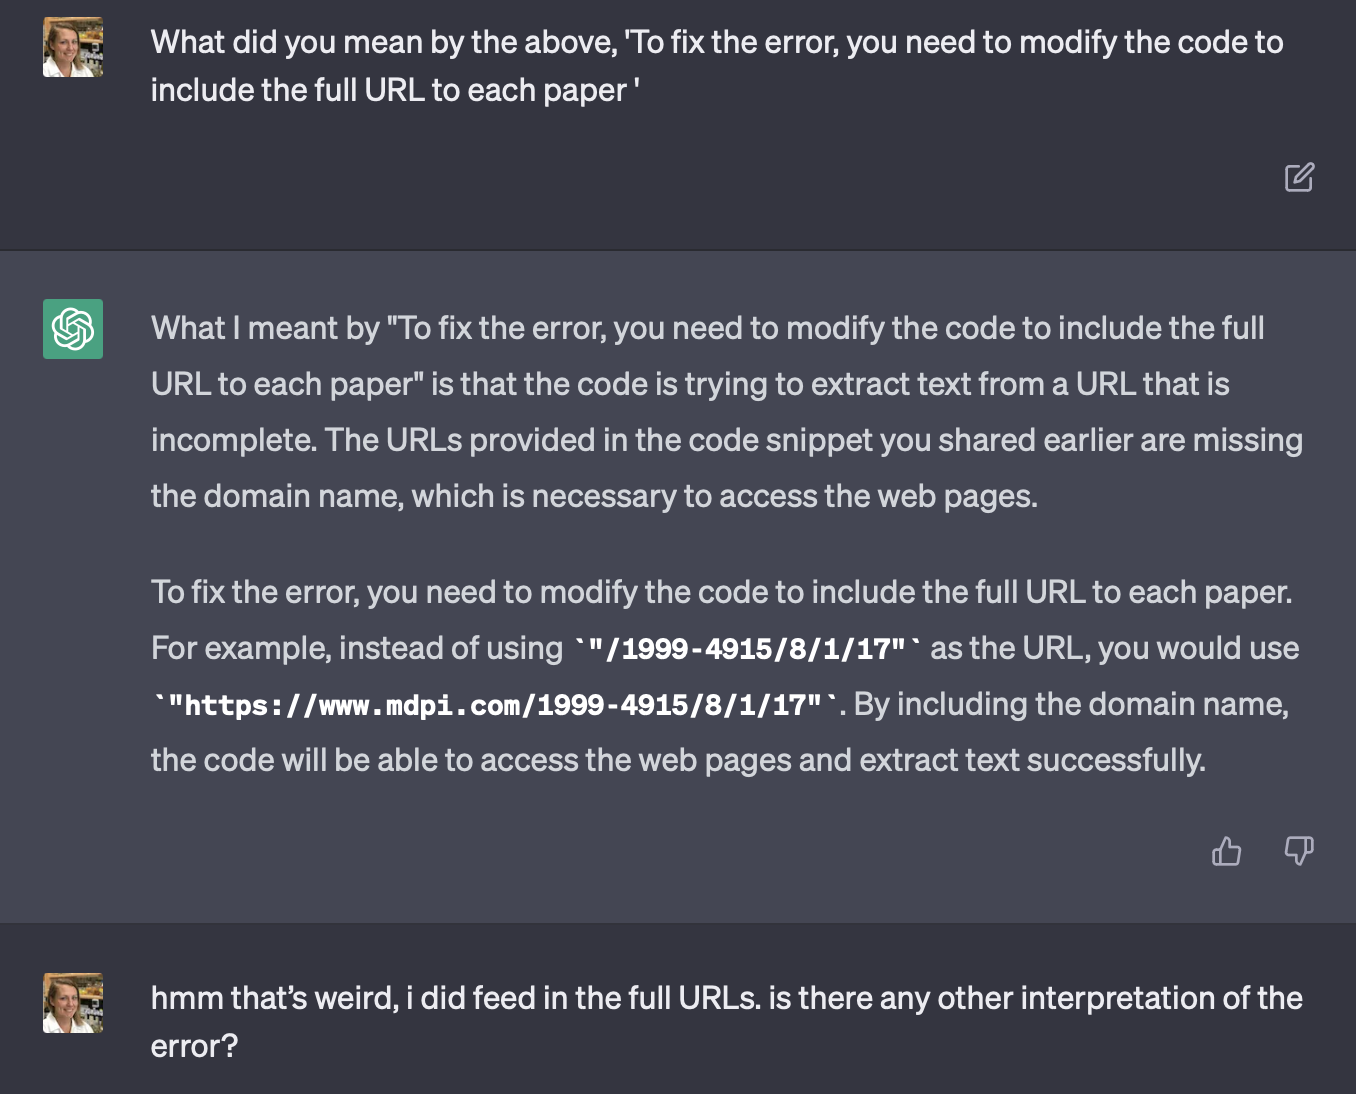
Importantly, I was asking pretty rudimentary things. Things like ‘How do I do what you just said?’, ‘I’m confused’, ‘what does missing schema mean in the error i pasted in earlier?’ ‘hmm that’s weird, i did feed in the full URLs. is there any other interpretation of the error?’
I eventually wasn’t bothering to phrase questions, I was just pasting in error messages with no context. But by asking ‘why’ continuously, like a 5 year old, ChatGPT would eventually say something that I could latch onto, and sometimes it would reveal some really useful tips! And the best part was, it never laughed at me or said ‘You are asking such stupid questions, it is clear you are wasting my time and should go learn python before attempting to make a chatbot’.
Sometimes I’d get extremely useful nuggets I could keep in my toolbox for the future. For example, at one point, ChatGPT casually mentioned that I should ‘clone the Github’ of the tutorial I was following. This was gamechanging! Why? Because before that I had been constantly copying and pasting from the tutorial. But Marc Päpper (tutorial guy) had also put all his code on Github. Instead of having to make the files he was telling me to make, I could just zap them all into my Colab at once by cloning his Github. (No wonder everyone raves about Github! If only we had these kind of reproducibility tools in biology…)
Together, me + ChatGPT made a chatbot
Finally, hours later (seriously though… not days, not weeks, not months… hours), we did it! I successfully used ChatGPT to help me make a chatbot. I followed the tutorial and recreated what Marc Päpper had done, and got the same answer out of my chatbot as he did. It was a WILD feeling!!
I wasted zero time; I now needed to make my own chatbot, based on my own content, not Marc’s website. I didn’t have a sitemap like he did, but I did have a list of the URLs from all 216 issues of our Capsid & Tail phage community blog that we’d published each week for the last few years. I felt ready to make this happen.
How I made my Capsid & Tail chatbot
If you’d rather see the finished product first, Jan just put it online! If you want to follow along, here’s my Google Colab notebook for the project.
Note: for most of this, I didn’t have to change the code; it came straight from the tutorial! There is essentially just one part I changed. But I’m including the overarching steps you you can see the entire process.
Also note, this is what I did, not ‘best practices’ — as I hope I’ve made clear, I have no idea what the best practices are!
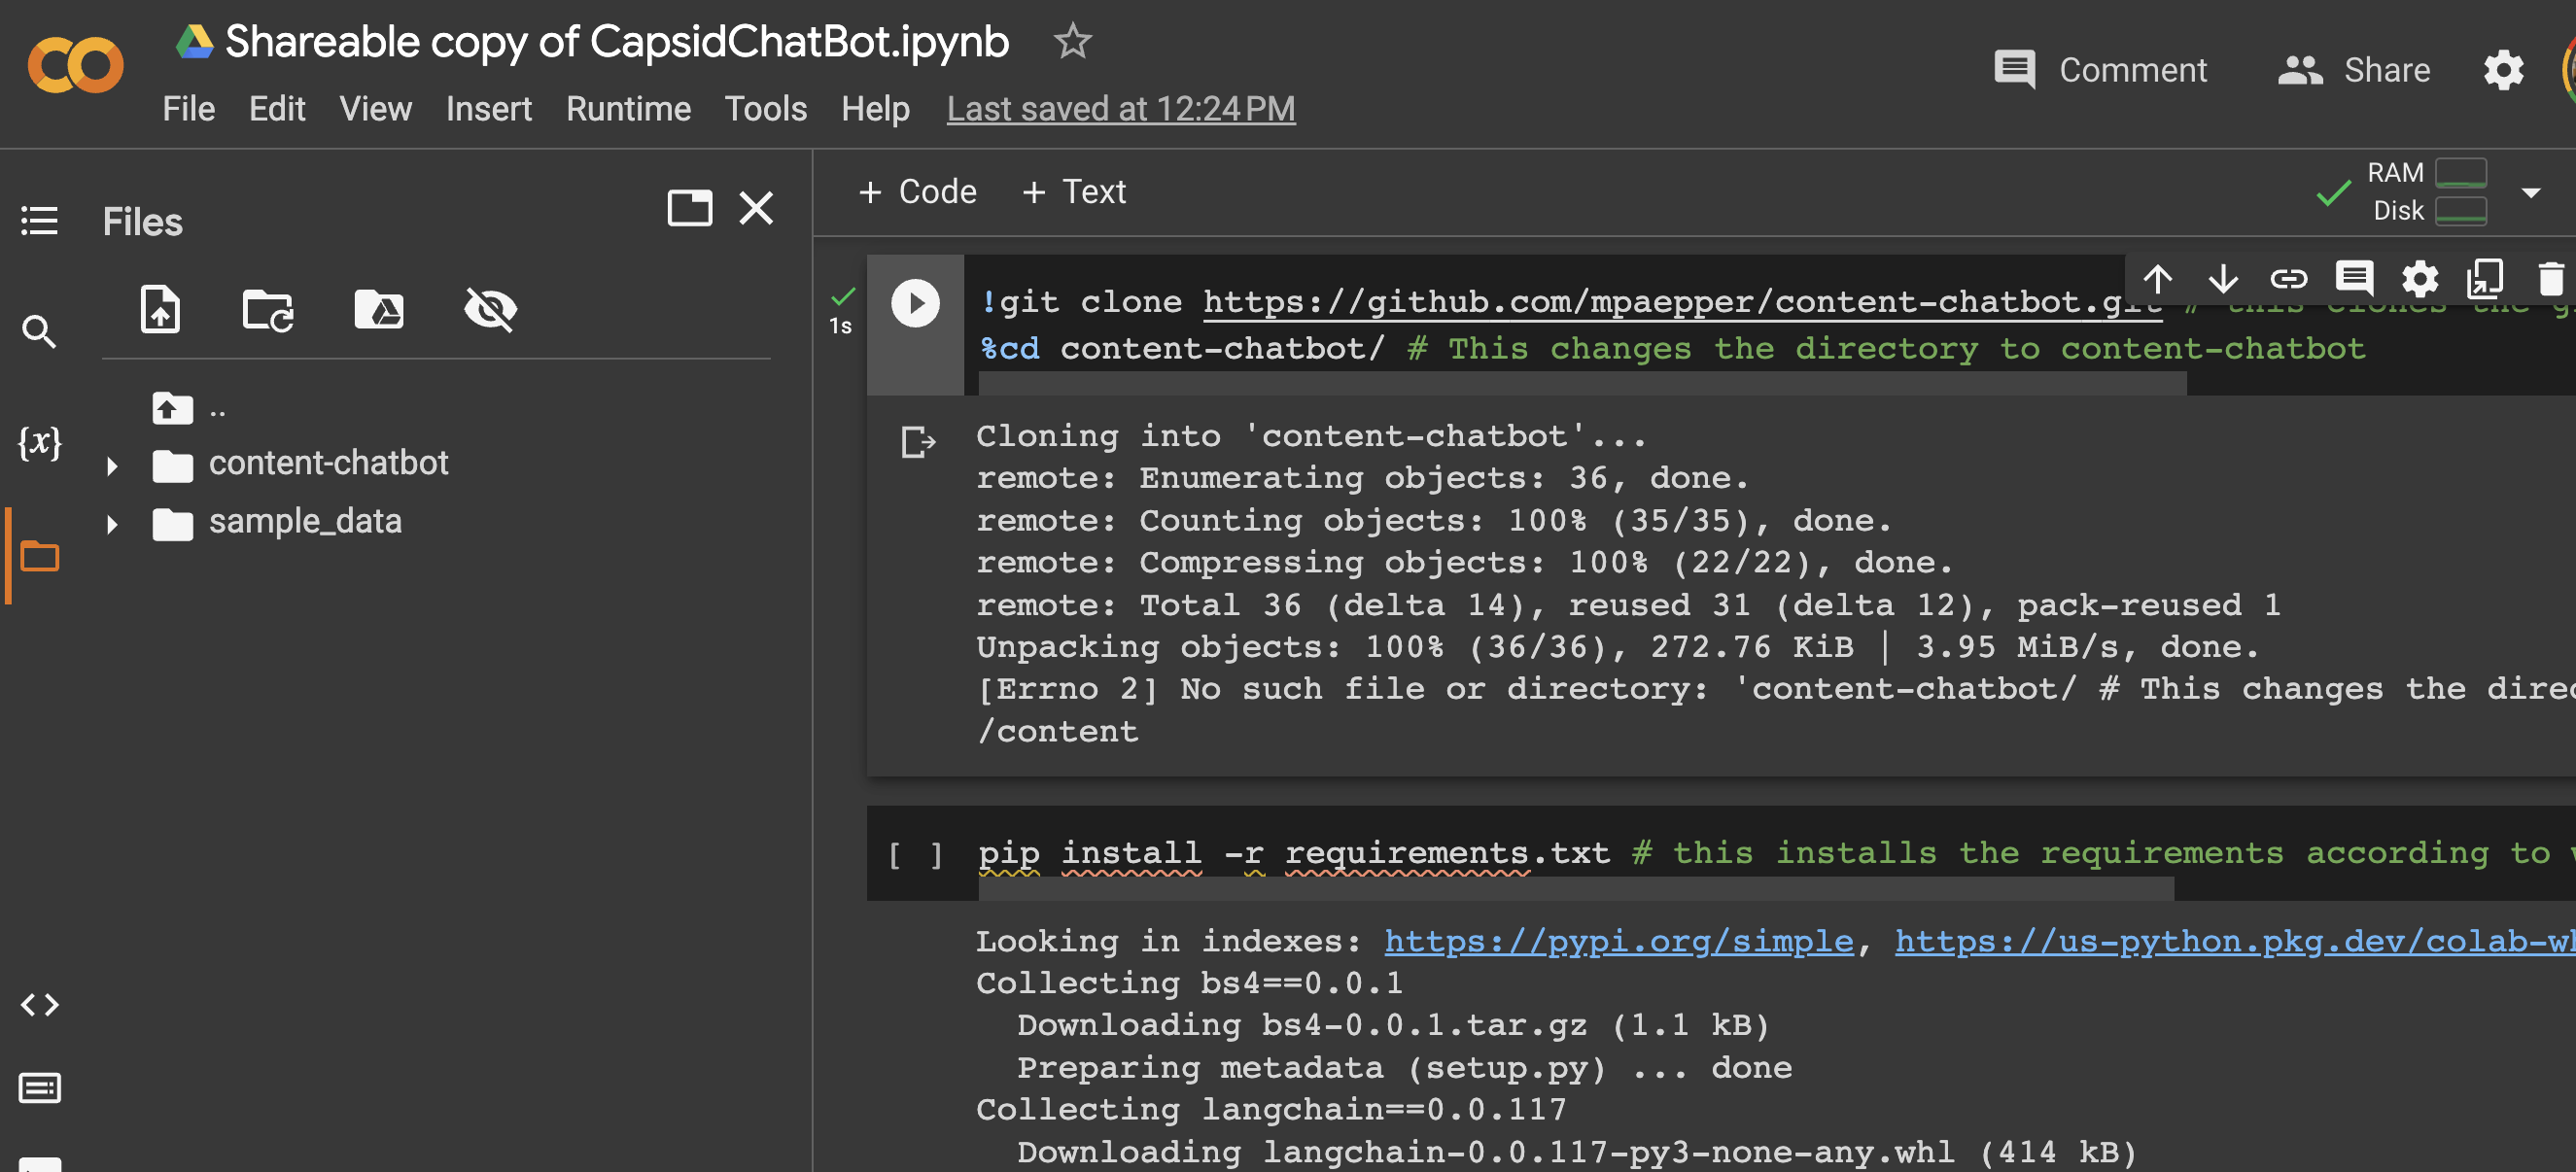
Step 1: Cloning the tutorial project Github
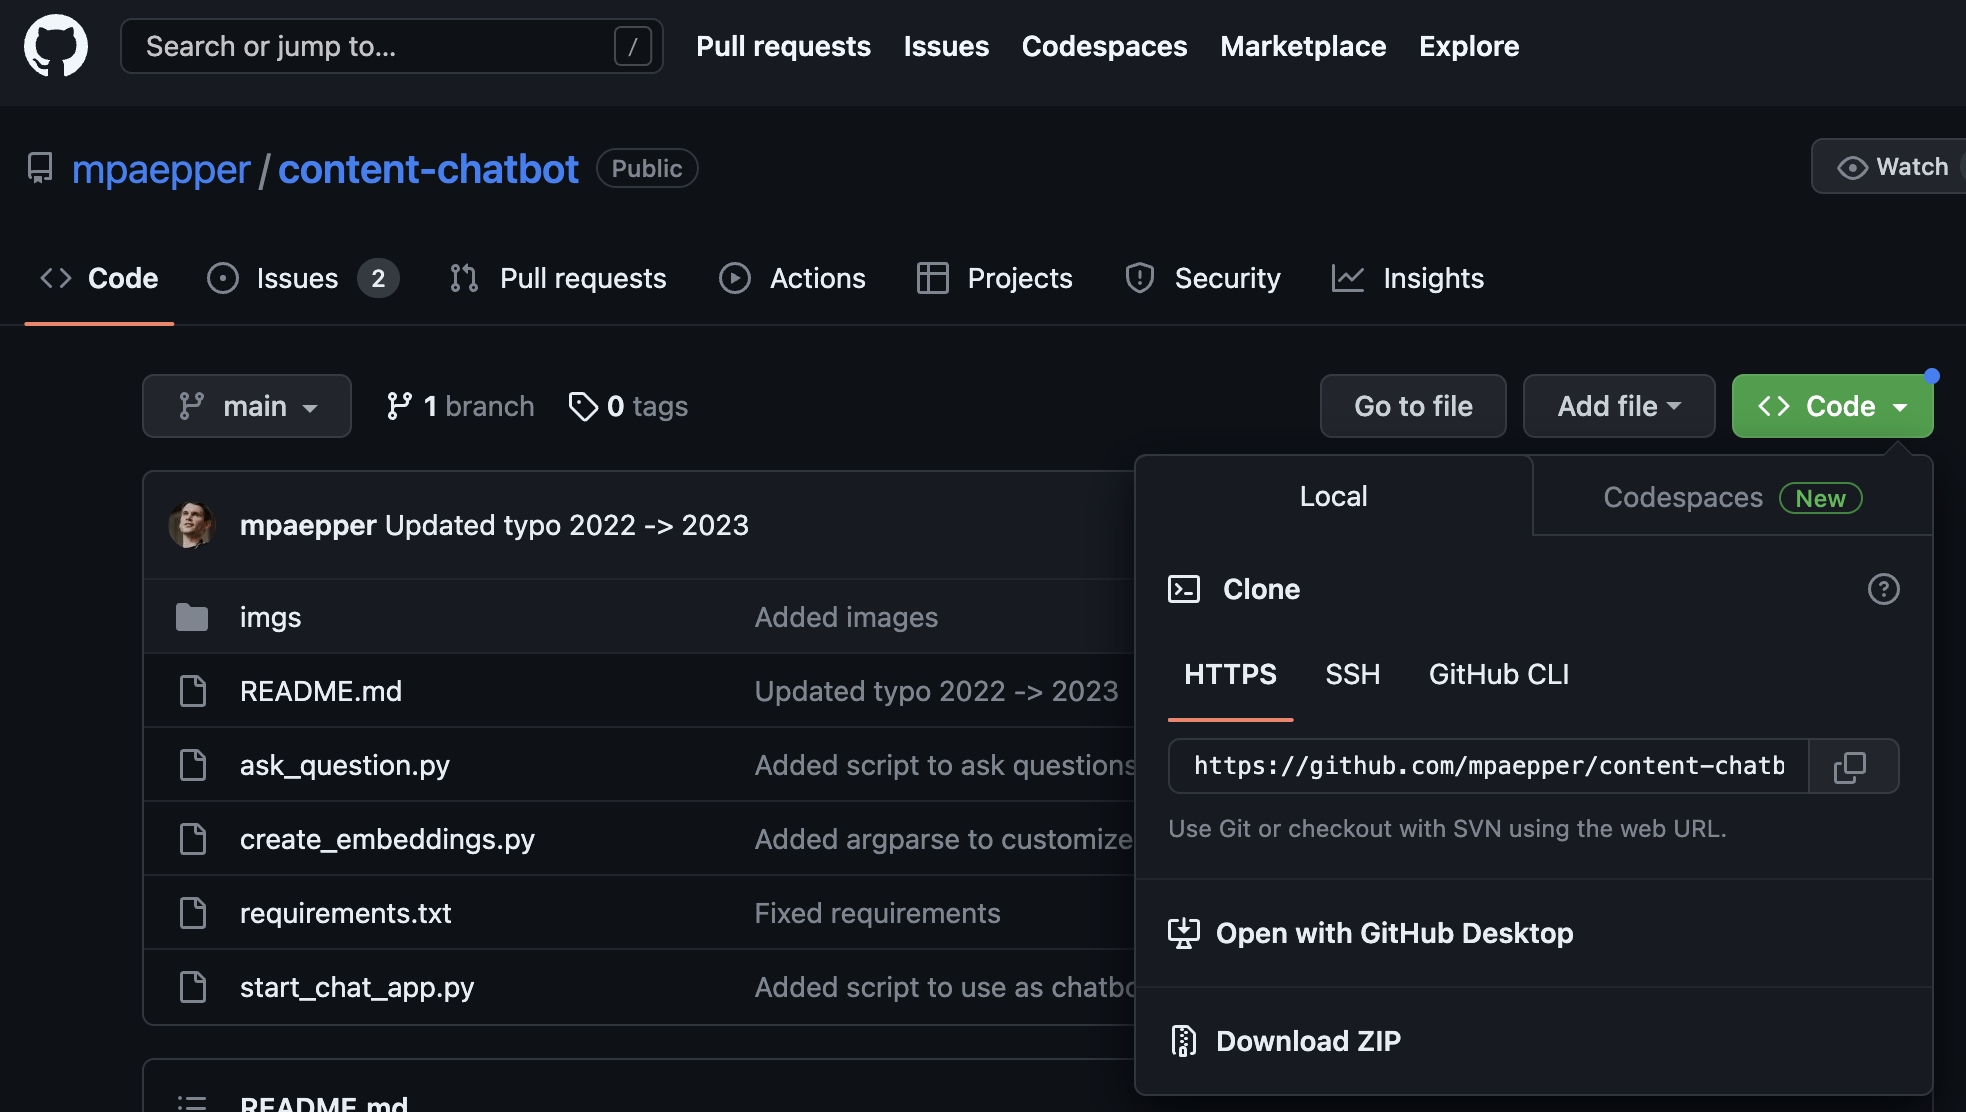
As mentioned above, the tutorial included a Github link. To clone it, you go to the project page in Github, click the green ‘Code’ button (top right of below screenshot), and it gives you the ‘Clone’ URL.
Now paste that into your code (see below) and all the files from the project will be magically available to you in your Colab notebook. No copying and pasting!
!git clone https://github.com/mpaepper/content-chatbot.git
Step 2: Installing the ‘requirements’
I next had to install ‘requirements’. (I’m told requirements are ‘dependencies’, ie. stuff you need for the code to run).
Luckily, part of what was cloned with the Github project was a file called ‘requirements.txt’ (and apparently it’s pretty standard to save your requirements for any project in a file called requirements.txt’). I found ‘files’ in my Colab notebook (left panel), and could indeed see the requirements file.
So I went ahead and installed it like this!
pip install -r requirements.txt
Step 3: Giving it my OpenAI API key
Note: At this point I switched to following the ‘readme file’ within the Github project instead of the blog post, since the readme seemed more straightforward for a beginner (it seems the blog post is for explaining to programmers HOW the code worked; whereas for me, I just wanted to MAKE it work).
I found this sentence in the readme:
“Once you have the $api_key, you can run export OPENAI_API_KEY=’$api_key’ in your terminal.”
Hmm, so I needed to have an OpenAI API key. I had seen on another tutorial Jan had made me watch (one of James Briggs’ Langchain tutorials) that getting one of these was free — you just go to your OpenAI account, go to Settings, and click to generate one.
Ok, did it. Now back to Colab to type it in. Error. No problem — I whined to ChatGPT about it, it gave me new code, I took its word for it and pasted it in, and voila! It worked.
Step 4: Running the first ‘script’
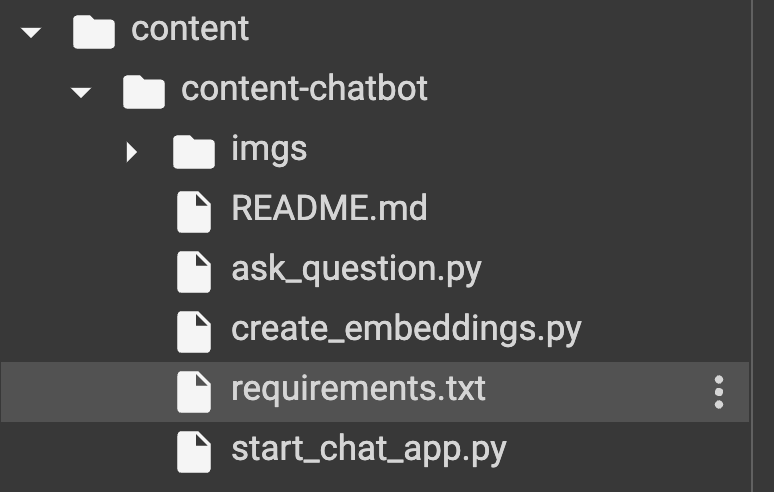
At this point it seemed the ‘setup’ phase was done. The next step in the tutorial involved running a series of ‘scripts’. (As I now understand, a script is just a bunch of code, living inside a file).
The first script to run was the ‘create_embeddings.py’ script. From the readme:
create_embeddings.py: this is the main script which loops your website’s sitemap.xml to create embeddings (vectors representing the semantics of your data) of your content
I could see the file called ‘create_embeddings.py’ in my Colab. Double clicking on it, I could see there was a bunch of code inside it.
Now this led me to another structural question… should I copy the code within that script file into the main middle section of my Colab notebook? The readme said to ‘simply run’ this:
python create_embeddings.py --sitemap https://path/to/your/sitemap.xml --filter https://path/to/your/blog/posts
Which made it sound like I didn’t have to copy and paste the code… I could just ‘call’ the file by name. So maybe I’d just create a copy of ‘create_embeddings.py’ and use it straight from there.
Note: I did this at first, but when I left and came back to my Colab notebook, I realized that Colab does NOT save your files once you close it! So if you make changes to code in a script, it will not save unless you save a copy of that file in your Google drive or onto your computer somehow. Fortunately Colab DOES save what you put in the main middle section of the notebook, so I found it was nicer, for any code you want to modify, to copy the code from the script into the middle section of the notebook, and modify it there.
Step 5: Changing the script so it would accept my Capsid & Tail blog post URLs instead of a ‘sitemap’
At this point I realized the hard work needed to begin. I needed to understand the code in that script enough to know what part of it to change, so it would take my Capsid & Tail blog posts instead of Marc Päpper’s sitemap.
I didn’t have a site map (I had asked Jan and he said we didn’t have one). What I did have was a list of links to our blog posts (in a spreadsheet). I figured I could copy and paste those into a text file. But then what? I needed to somehow, in the code, swap out ‘site map’ for my file full of links. I figured this would be doable, since ChatGPT had told me a site map is just a list of links after all.
I did my best to phrase what I wanted to ChatGPT:
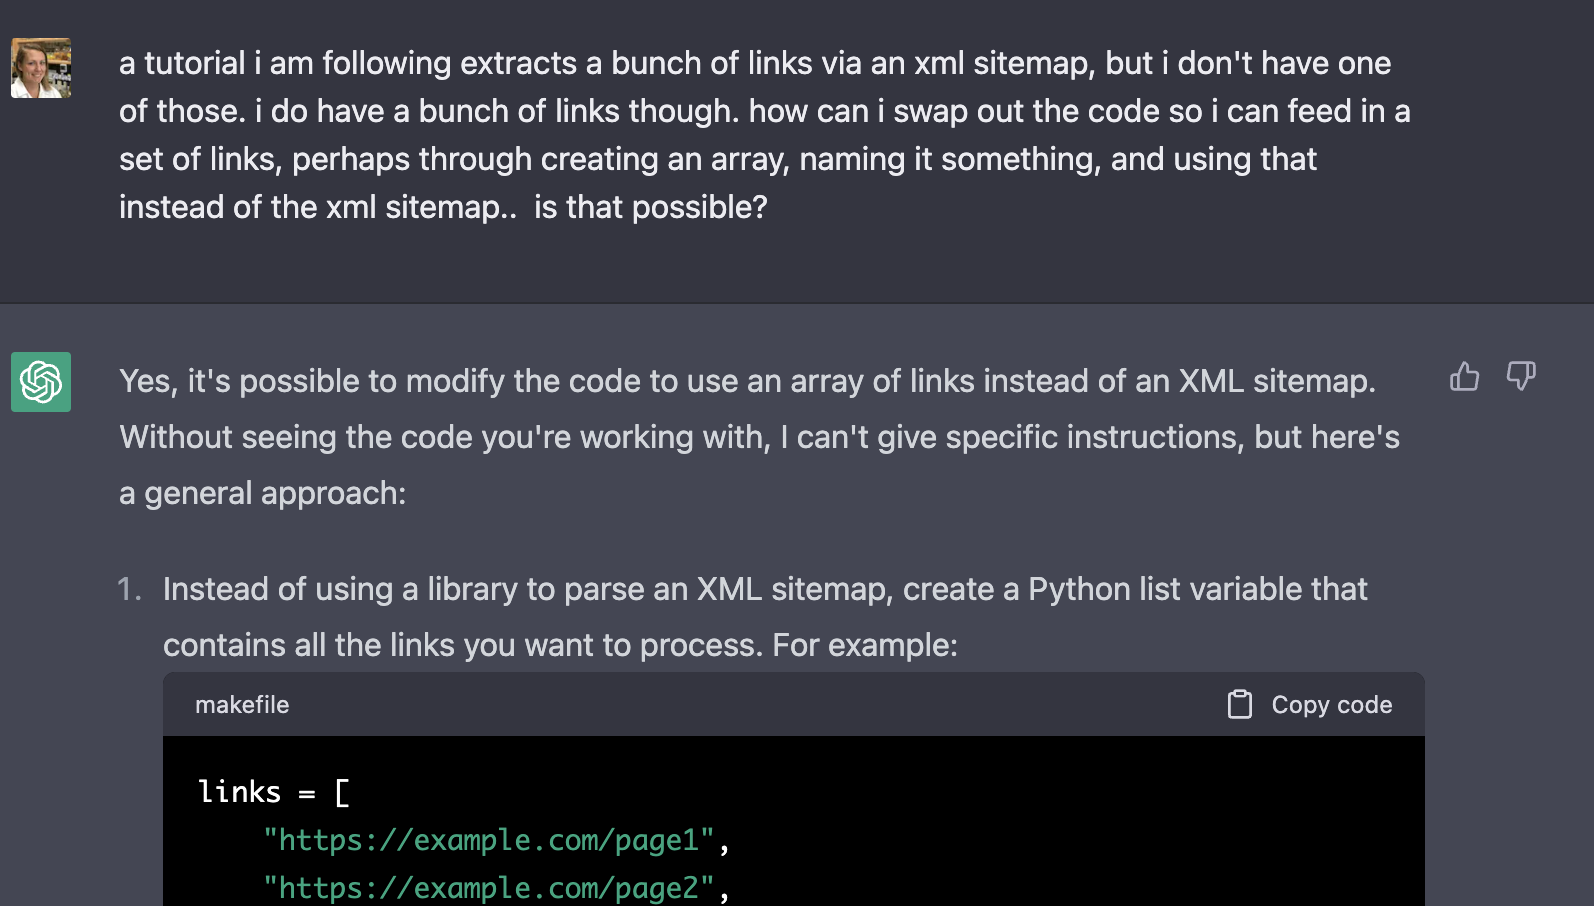
Excitingly, it did not say ‘what you want is impossible’ — it got straight into tactics. Excellent. And even better, it had an answer I sort of understood! (I had learned about arrays/lists in my early Codecademy days…)
Cool! So ChatGPT would be able to help me write the new code. Now to excise the code I didn’t want from Marc Päpper’s script. To do this, I needed to understand what the different chunks did. I started copying and pasting the chunks into ChatGPT and asked it to explain each. I eventually located the right area.
pages = []
for info in raw['urlset']['url']:
# info example: {'loc': '<https://www.paepper.com/>...', 'lastmod': '2021-12-28'}
url = info['loc']
if args.filter in url:
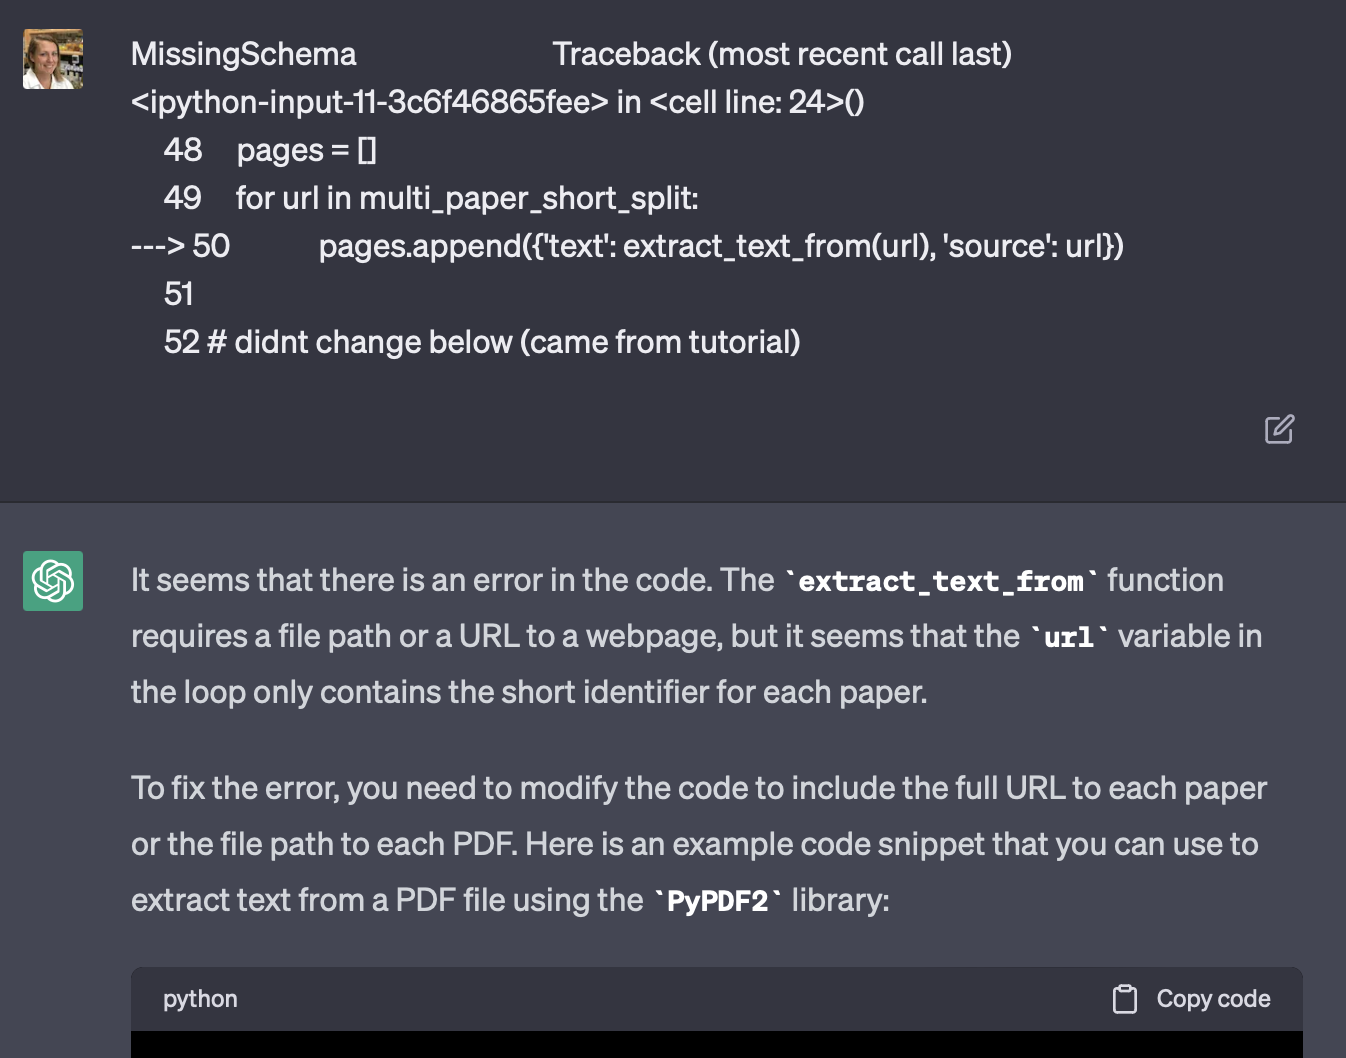
pages.append({'text': extract_text_from(url), 'source': url})
This is the part of the code that creates a new ‘dictionary’ called ‘pages’, loops through a sitemap to collect all the text from all those URLs, and dumps all that text (along with URLs for each) into the ‘pages’ dictionary via the ‘append’ function.
With the (immense, repeated) help of ChatGPT, I replaced that section with my own:
with open('links.txt', 'r') as f:
  links = f.read()

links_split = links.split('\\n')

print(links_split)
What this code does is opens my file called ‘links.txt’ (this is where I pasted in my Capsid & Tail links). It then ‘splits’ the links into a list, and calls that list ‘links_split’.
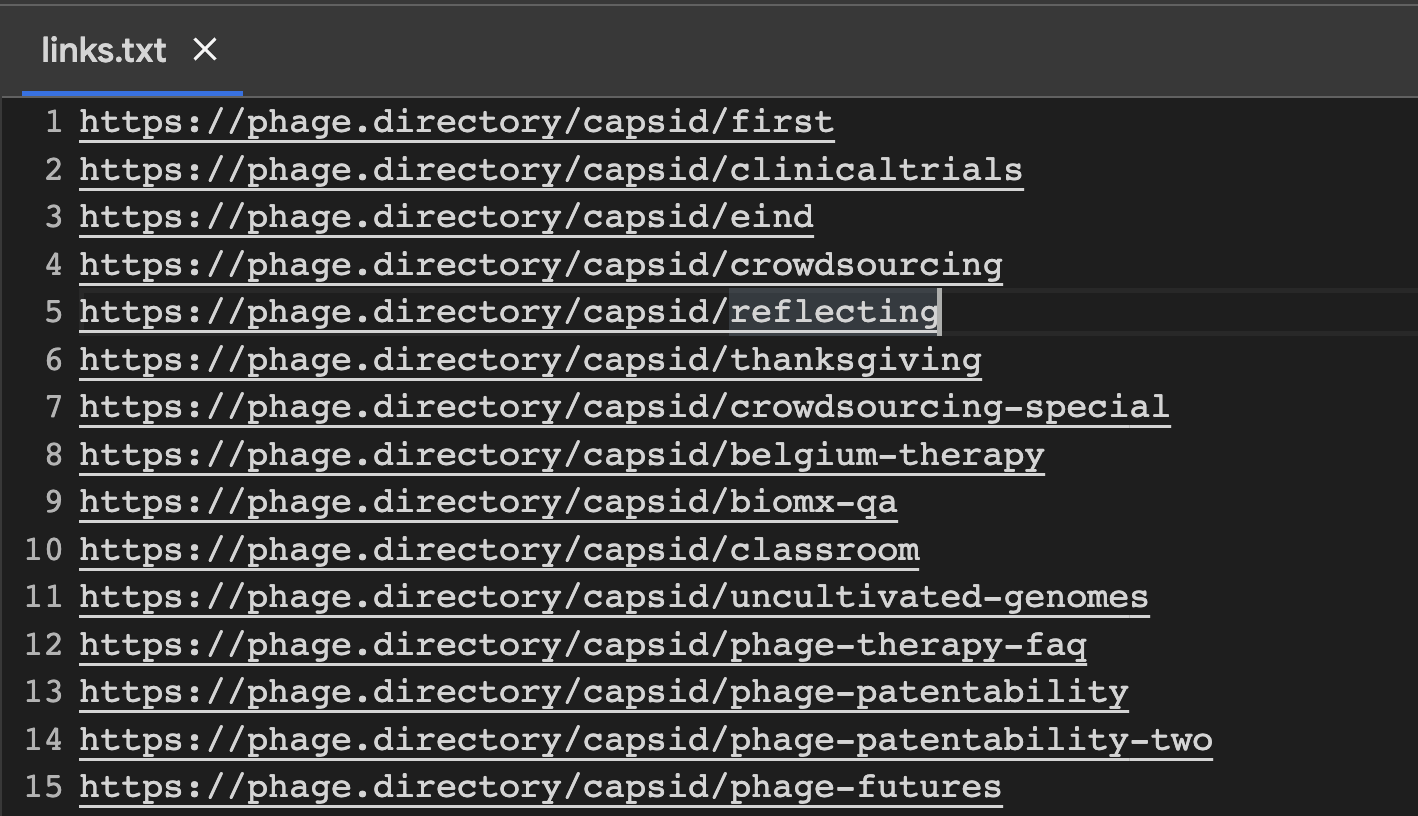
This is what my ‘links.txt’ file looks like.
Of note, this code also ‘prints’ my split list. I clicked run, and voila! At the bottom of the screenshot below, you can see the output: a bunch of links in a list! And they look like Capsid & Tail blog posts! Winning.
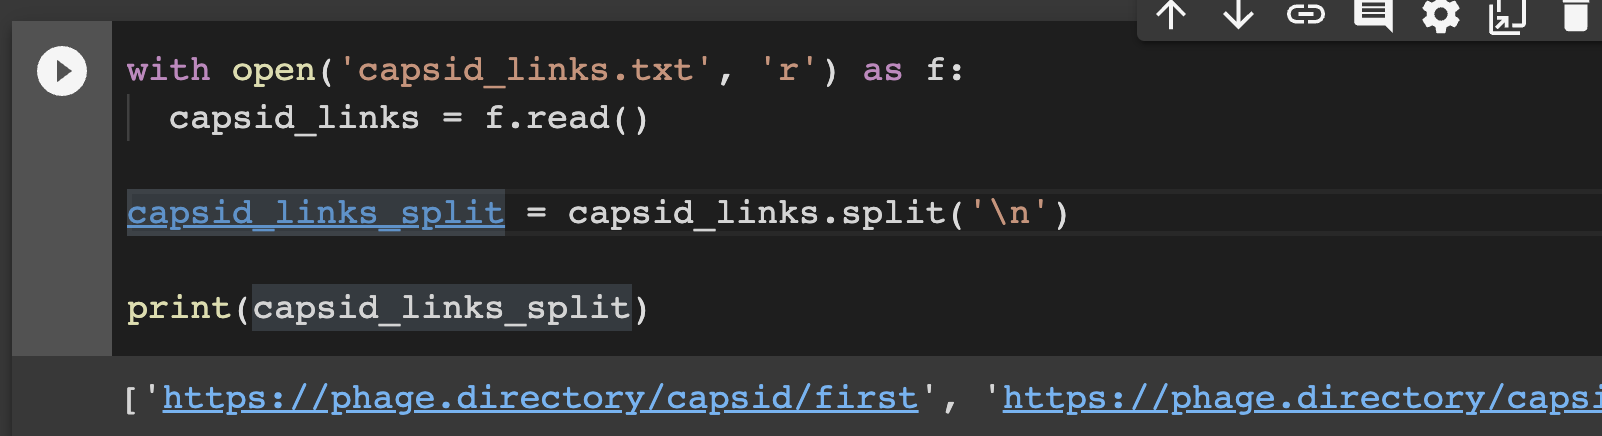
(FYI, Jan told me ‘print’ statements like this are great to sprinkle in anywhere you want, if you want to check if stuff is working as you think it should).
After this, I got to the ‘pages’ section. Instead of Marc Päpper’s version above, I told it to loop through my ‘links_split’ list, get the text from each, and ‘append’ each to my ‘pages’ dictionary.
pages = []
    for url in links_split:
            pages.append({'text': extract_text_from(url), 'source': url})
At this point I was back in line with Marc’s code; I had what he had; ‘pages’ = a dictionary full of text (and corresponding URLs for each text) that was extracted from a bunch of links. From here on out, I didn’t really have to change anything! I just ran his same code.
Step 6: ‘Splitting’ my text into little digestible chunks
The next part of the create_embeddings.py script involved some pretty cool stuff (for this, Marc’s blog post is good for explaining what’s happening, if you really want to understand). My understanding is, all the text I’d just fed into ‘pages’ was being chopped up into little chunks, using a function (piece of code that does some piece of work) called ‘Character Text Splitter’ (which is something the Langchain team created).
Using the handy dandy ‘print’ function, I could see that it had done this to my Capsid articles! Look at them, each split into some number of chunks:
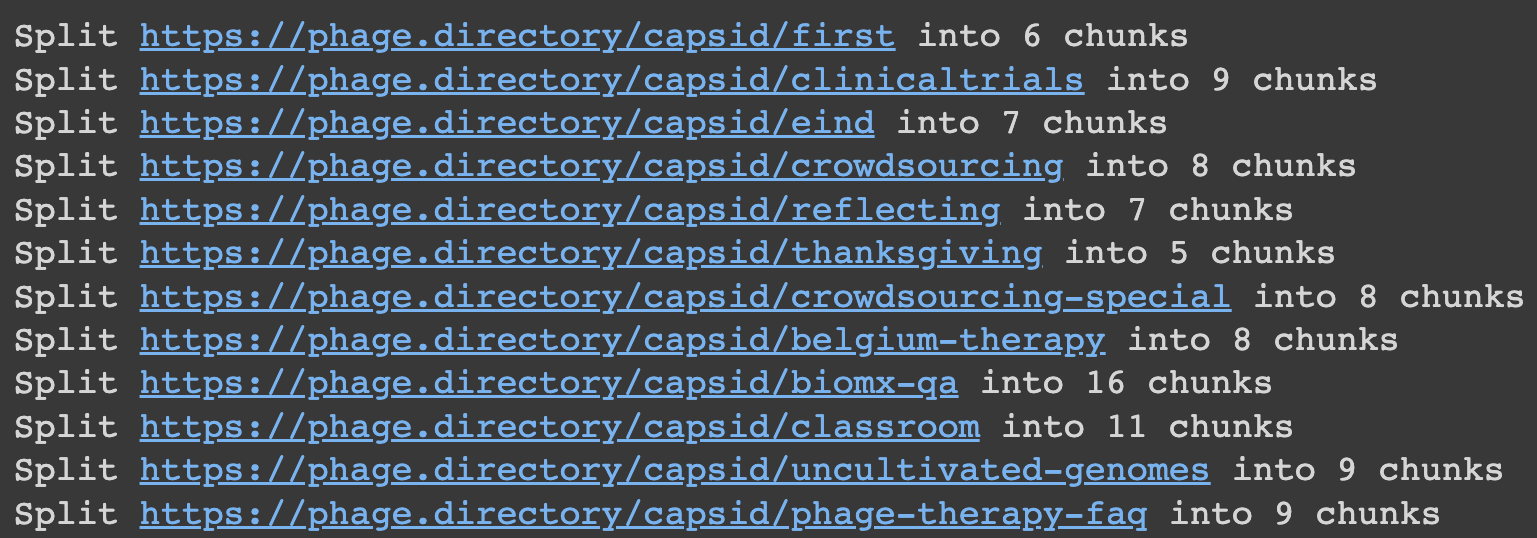
Why small chunks? Because as we know, ChatGPT and other models like it only let you feed in a bit of text at once. This lets you give it a lot of info at once — by first splitting it into bitesized pieces.
After this, the ‘create_embeddings.py’ script does the thing it was named for: it ‘creates embeddings’ from all the chunks of text. This part is another innovation on Langchain’s part, as I understand it (and another thing to read about in Marc’s blog post). In my understanding, creating embeddings means turning these little chunks of text into numbers (‘vectors’), ie. sets of coordinates. Then those coordinates get stored in a database somewhere, and then those get fed into a language model like GPT-3 or ChatGPT. Then when you ask questions, you get responses that include all this new information you just ‘loaded’ into the model!
Step 7: Using the ‘ask questions’ script
This was starting to get really exciting. It was working!!!
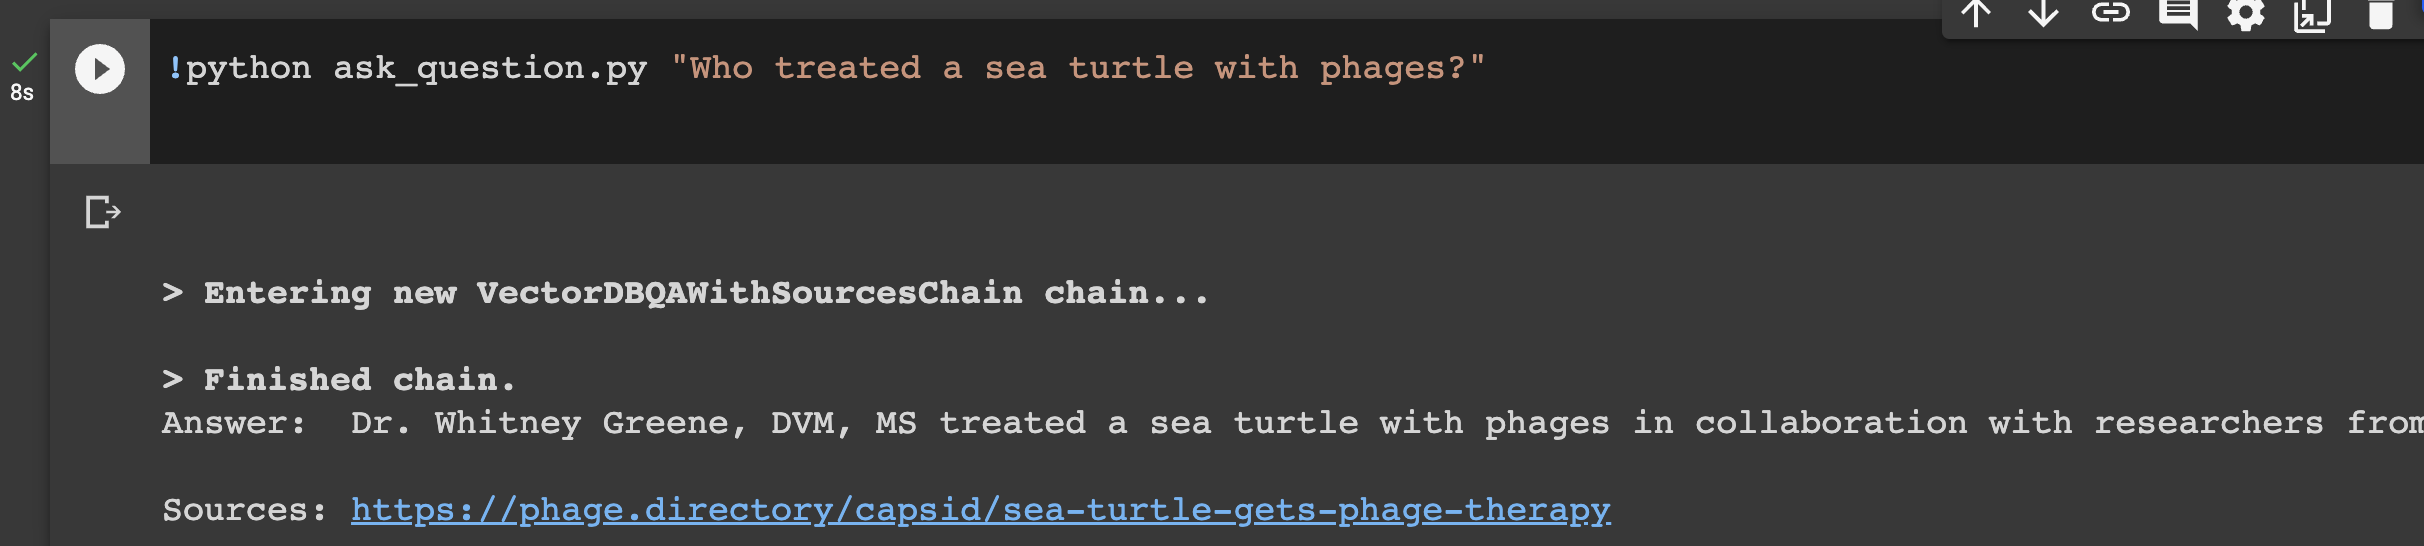
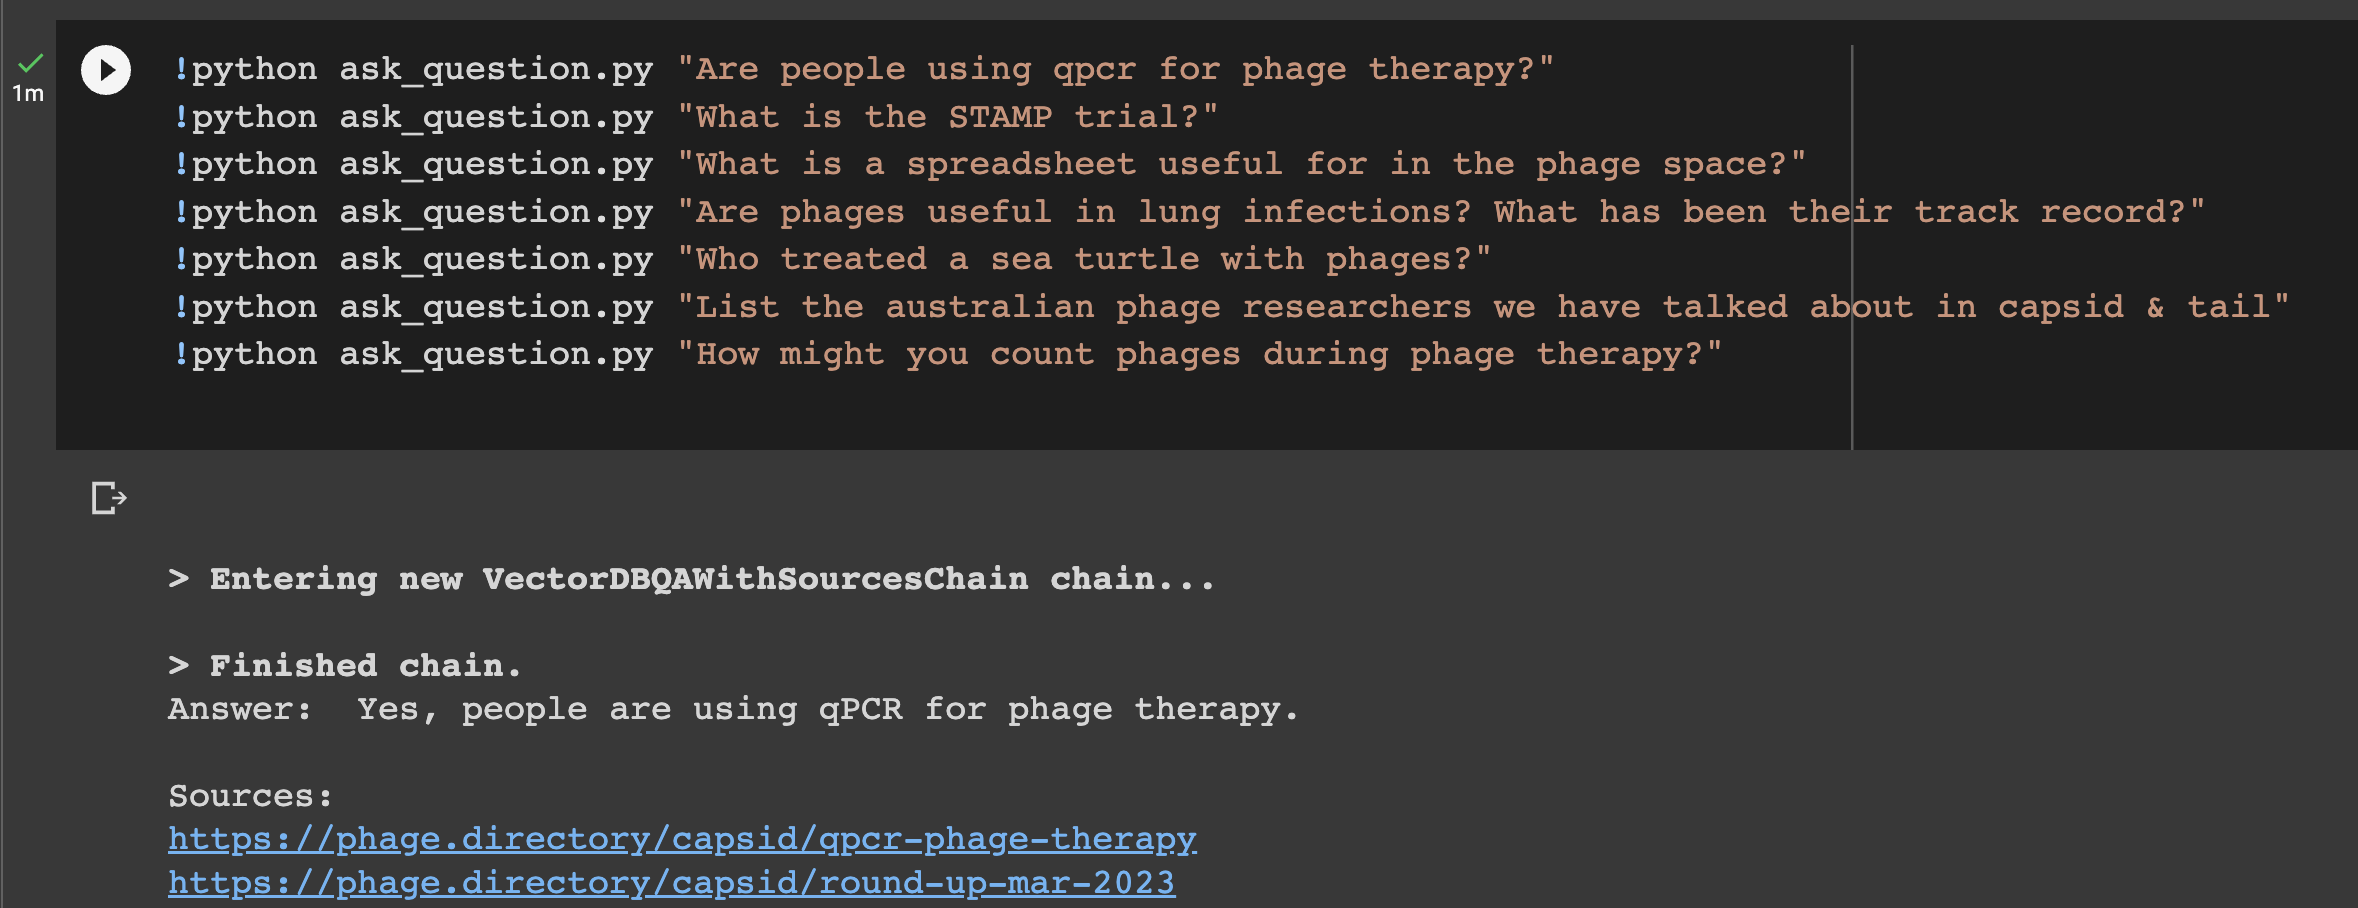
I next did the thing that made me squeak in delight! I called upon the the ‘ask_question.py’ script that Marc wrote, and replaced his example question with a phage question. The first one I asked: Who treated a sea turtle with phages? And. I. Got. The. Answer. In a second. !!!
This was a moment like any of the most exciting of my biology career. I made the thing! The thing listened to me! I coded something! I then proceeded to ask it all the questions I could think of. It kept answering them well, and even giving its sources!
Step 8: Discovering the last part: the chat bot interface
Finally, through copying the contents of Marc’s ‘start_chat_app.py’ file into Colab, I was able to chat with the bot! I gave it a ‘context’ (replaced what I saw in Marc’s script that related to machine learning-related stuff to phage-related stuff) and it could talk to me. Amazing!

Reflecting on how incredible it is I built ANYTHING let alone something useful
This whole experience has left me with some major realizations.
First, in the words of my parents when I was a toddler, ‘Very Good, Jessica!’ I had coded! I felt amazing. I have wanted to be able to code forever, but have always been told (mostly by professors) that ‘13 year olds will run circles around you before you can learn’. So I never really put in the time.
Second, I learned how to use ChatGPT to ask questions about code. I would not have been able to do this without a resource like this. (I mean, if I had a human over my shoulder, sure. But humans who can code have better things to do than patiently answer my dumb questions for hours… ChatGPT is free, and never gets impatient or disappointed!)
Third, the actual thing I built showed me the massive potential of adding your own information/documents into large language models like ChatGPT! This superpowers the model so that it knows a lot of your really specific, relevant information. By figuring out how to ‘load’ information into the model, you aren’t limited by a few paragraphs in ChatGPT… you can upload massive datasets, and have conversations with a robot that knows it all at the click of a button…
Fourth, doing this exercise made me realize that non-coders can build VERY powerful things. We couldn’t really do this a month ago, and now we can. Others are doing this too, for example, take BabyAGI, a powerful tool that gets ChatGPT to create its own task list, execute on the tasks, and reprioritize them, which was made by a non-coder. Altogether this means a whole new level of possibility… it’s not just the coders who are going to be able to build useful tools. Us ‘non-coders’ are going to be able to use our domain knowledge and build stuff too.
All in all, I think the fact that I could do this has huge implications, on multiple levels, and I am officially hooked on figuring out how I can use these new powers. I will continue to share what I figure out here, and would love to hear from anyone re: suggestions on problems they’d like solved (ideally in the science/biology realm, because why not! I’m thinking journal article chatbots, grantwriting tools, protocol optimizers, ‘wizards’ who know a bunch about a given topic, like cloning or PCR…). Alternatively if anyone has tutorials/Github projects they find that they’d like to see applied to their own question/problem, send them my way! I’d be happy to give them a try, and report back on my struggles and successes!
How to use the Capsid & Tail chatbot for yourself
Just as I was putting the finishing touches on this blog post, Jan took my code and built it into a web app (!!), at our new project, labspace.ai. Try Capsid Chat here:
Or if you want to dive into the code & reproduce this all yourself, here’s my Google Colab notebook for this project: https://colab.research.google.com/drive/12swjyhWmdA-nAfk3U7Uq4UhpZWC1oxHx?usp=sharing (*updated this link 4/16/23)
Here’s my Capsid & Tail links file: ‘links.txt’, which you’ll need to run it: https://drive.google.com/file/d/1YB5LuhNsr_v-WjloYiPoxZSsIUel_TW0/view?usp=share_link
- Make a copy of each for yourself, save to your Google drive
- Click Run for each code block; if there’s an error, paste it to ChatGPT and see if you can fix it (don’t move on to the next block until you fix it)
- Add your OpenAI key (make sure you get one first at platform.openai.com)
- Try to reproduce what I did with the Capsid & Tail links first
- Make sure you put the links.txt file in the ‘content-chatbot’ folder of the cloned Github project
- Ask it a question and see if it gives an answer!
How to create your own chatbot
Try it with your own list of links:
- Change the contents of the ‘links.txt’ file
- Try with a list of URLs you care about (even just one or two)
- See if it works!
- Note that some websites are not ‘scrapeable’ so they won’t work. Some journal articles seem to be in this category.
If you’re really excited about this, look at Langchain’s documentation, especially the part on ‘Document Loaders’ to find code snippets you can use to get text from pdfs, powerpoints, and other sources, not just URLs like I’ve shown here. See if you can swap out my code for new code you take from Langchain’s library, and see if you can make it run. It’s fun!
Making an interface so others can use what we build
In a future post (maybe soon) I’ll show how I’m learning to make an interface around code, so I can host it on a website, so people (me! or you!) can use the things we build without opening up the code. (Thanks in advance to Jan for helping me with this!).
Resources